
There are two main types of NVRAM+RTC solutions for Philips CD-i players to store user data and settings: 8 KB and 32 KB. They have a built-in battery that powers the non-volatile memory and the real-time clock. These two types are not compatible and thus cannot be replaced with each other (at least, not without hardware and/or ROM modifications).
There are other types, also 8 KB and 32 KB, but they concern only very few and rare devices. I point them out when necessary.
In this article, you’ll find information about the different NVRAM types and their alternatives. You’ll also find tips for repair and upgrades. If this looks familiar to you then you have probably read parts of it in my Modifications for Philips CD-i Players article before. Since the NVRAM section grew so large, I’ve completely rewritten it and will continue to update it in its own article.
8 KB (Timekeeper)
Probably everybody knows about the Timekeeper chips by SGS-Thomson / STMicroelectronics that are built into many but not all Philips CD-i players. As a rule of thumb:
– Low-end CD-i players (e.g. CDI210, 450 and most 470) have a Timekeeper.
– All players of the first two generations (Mini MMC and Mono I) have a Timekeeper.
If you are not sure about your player then check the mainboards section and/or this comparison table on ICDIA. Especially, if you have a CDI220 because both types of NVRAM are possible.
You can skip to the 32 KB section if your player doesn’t have this chip.
Timekeepers operate within the accuracy of ± 1,53 minutes per month at 25 °C. If necessary, you can calibrate it, see chapter Clock crystal.
The internal battery is a BR1225 coin cell. You can read more about this technology (Lithium Carbon Monofluoride / LiCFx) and its comparison to CR type batteries in the ST application note AN1011 and in these documents by Rayovac and Panasonic.
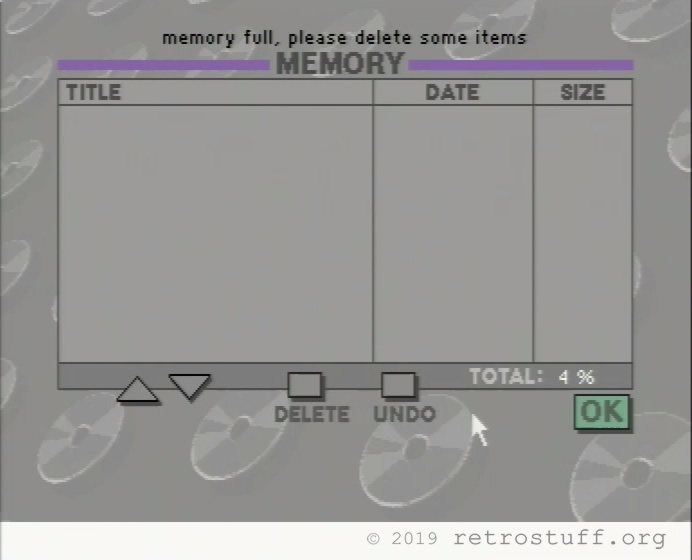
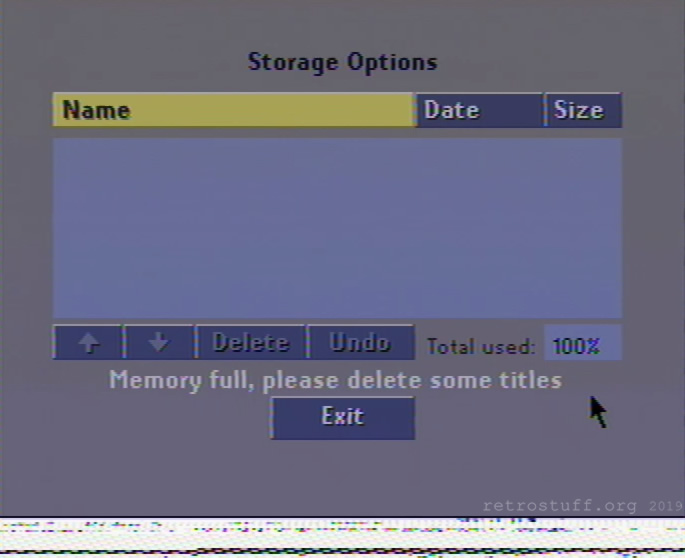
The battery life depends on several factors: The temperature of the environment, the state of the oscillator and whether the chip is connected to an external power source. The ST application note AN1012 explains this very well. Under the right conditions, it has a shelf life of several decades. Once the chip is powered on for the first time and the oscillator started (it can be stopped again via the clock registers), it will eat up the capacity and fail after some years. This leads to several errors in CD-i players, e.g. loss of internal data and date/time settings. It can also prevent the CD-i player from starting up and only have it display a light blue screen or the memory full error (with garbage at the bottom of the screen) – or nothing at all.

Generic tips
My preferred solution is to replace each failing chip with a 28-pin IC socket (to make future replacements easier) and a new chip. I’ve added an availability status to each of the chips below. Only buy the chips from the manufacturer or official distributors. Avoid buying “new” (i.e. old or fake) Timekeeper chips on eBay or AliExpress, even if the price is much lower!
The removal of the old chip needs fresh solder and plenty of flux, a powerful desoldering gun, desoldering wick and also a lot of patience because some (or all) pins are always soldered from both sides.
It is also possible to hack new batteries to broken chips. However, to begin with, I will only point out what to pay attention to and not go too much into the details of hacking.
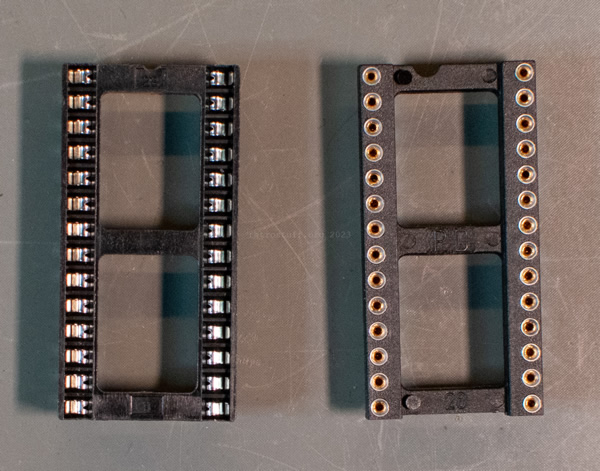
Socket
There are different types of IC sockets: Standard socket (left) and precision socket (right). Be sure to buy the cheaper standard socket, especially if you want to reuse the old Timekeeper. You will have a hard time getting the worn legs into the precision socket without breaking them. These a normal (wide) sockets – avoid the narrow sockets as they won’t fit.
Note for top-loading players (CDI450, 550 / Roboco) and FW380i: When in a socket, the chip will bump into the metal cage. While it is possible to squeeze it in, I don’t recommend it anymore. Read more about this here (section NVRAM height).

Clock crystal
After replacing or hacking a chip, it is advisable to calibrate it with the clock calibration tool in the low-level test. Especially, if you dug out and reused the 32,768 kHz clock crystal from the old Timekeeper.
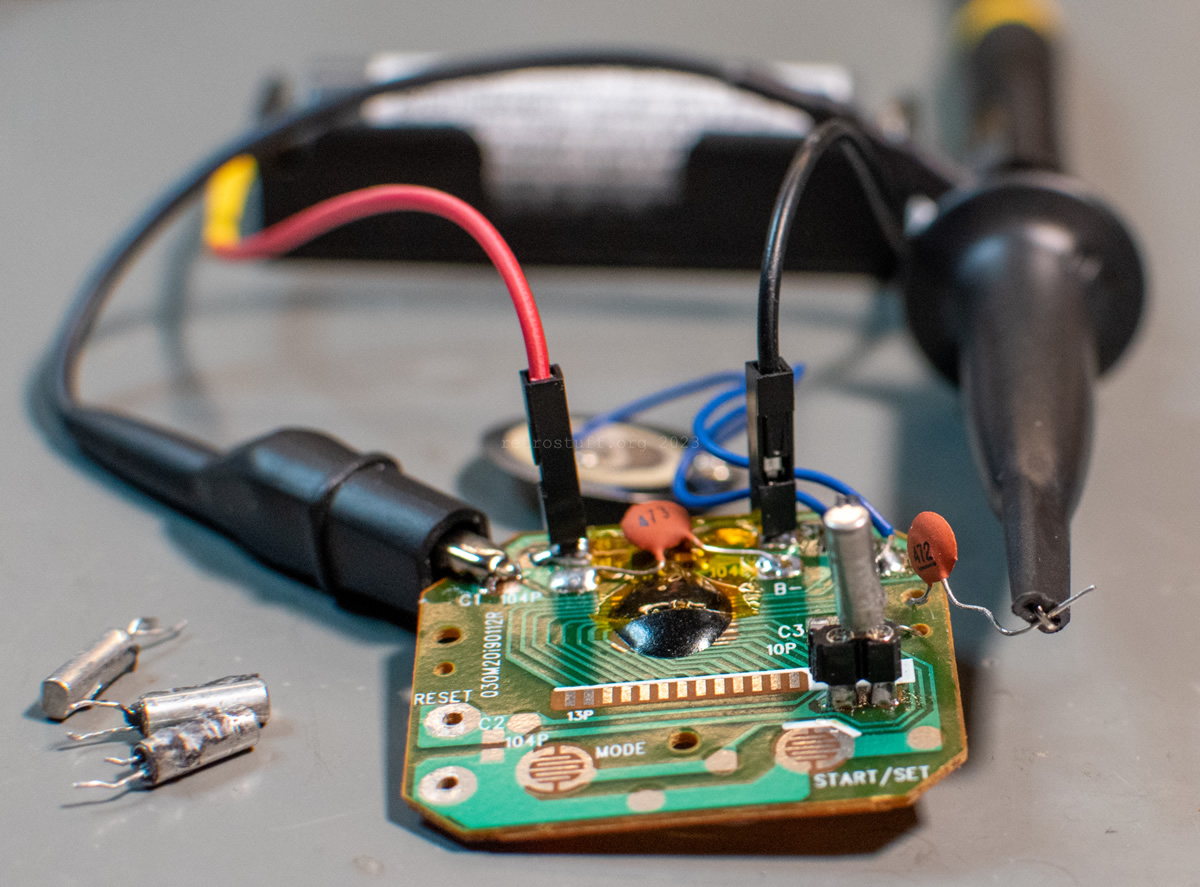
It is also advisable to check the crystals before reusing them. To do this you will need a test circuit and an oscilloscope or frequency counter. Such a test circuit can easily be made from an old digital clock, like this 30-second timer from a mouthwash (inspired by the article Uhrenquarz Checker (German)).

You’ll find two kinds of Timekeepers in Philips CD-i players. They are interchangeable but require different handling:
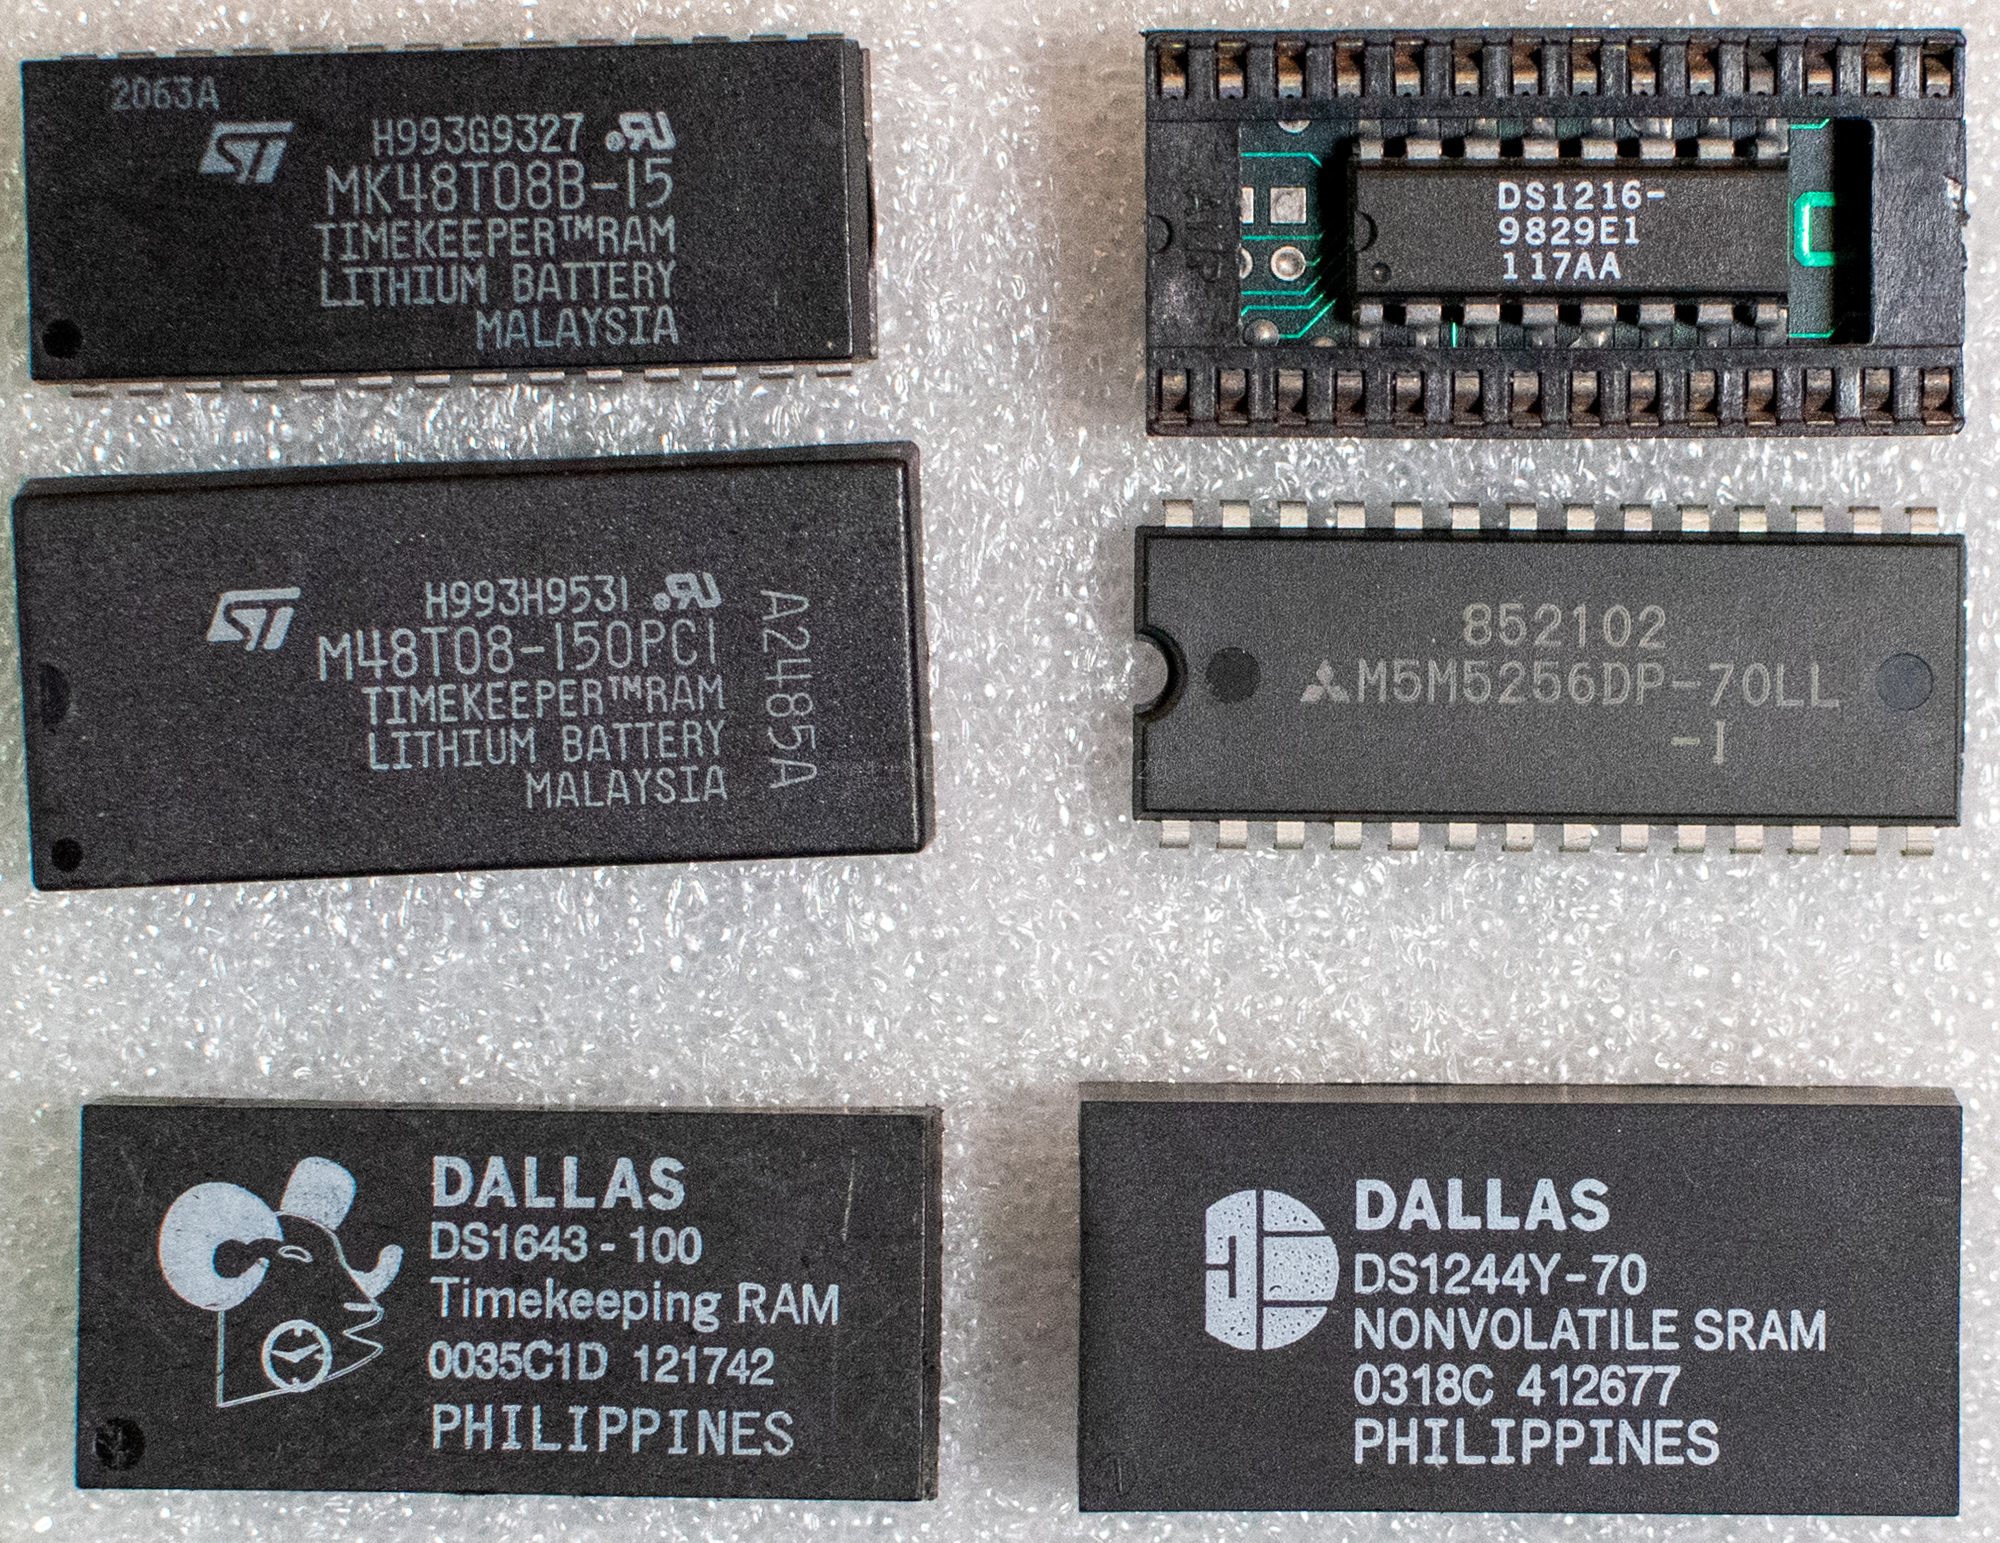
MK48T08B (old)
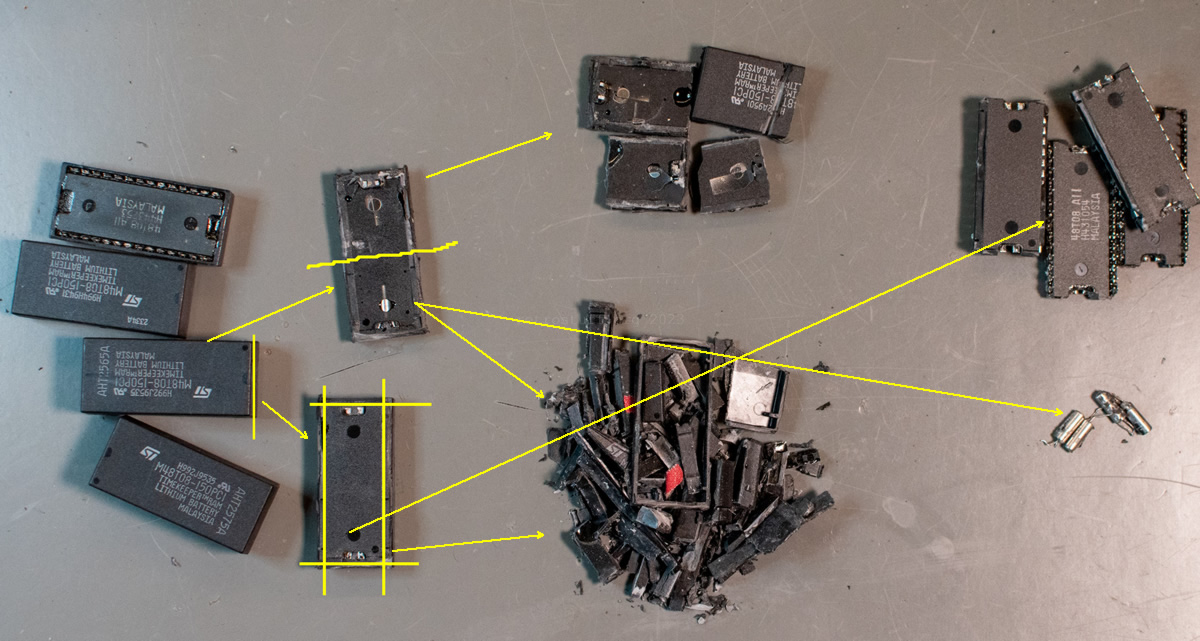
The SGS-Thomson MK48T08B-15 Timekeeper RAM chips have a top hat with a 32768 Hz crystal and a BR1225 battery that can be ripped off easily, especially when following a hacking tutorial for the newer chip.
Availability: The chips are no longer being produced (EOL).
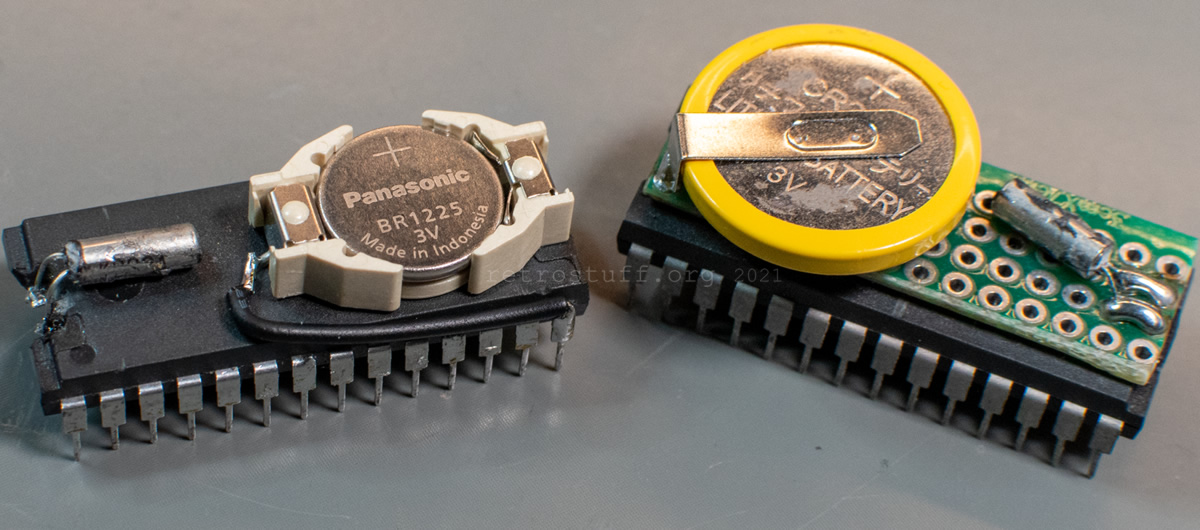
This is a collage of a dissection and how the components in the top hat are placed (crystal on the left and battery on the right). The left part is supposed to stay attached. I usually remove it too, dig out the crystal and clean it as well as possible without damaging it. Then, I break off the epoxy from both sides of the chip and pull out the left-over connectors vertically, until the pincer-like contacts are free. Do not break these contacts or you’ll have to drill into the chip to recover them!
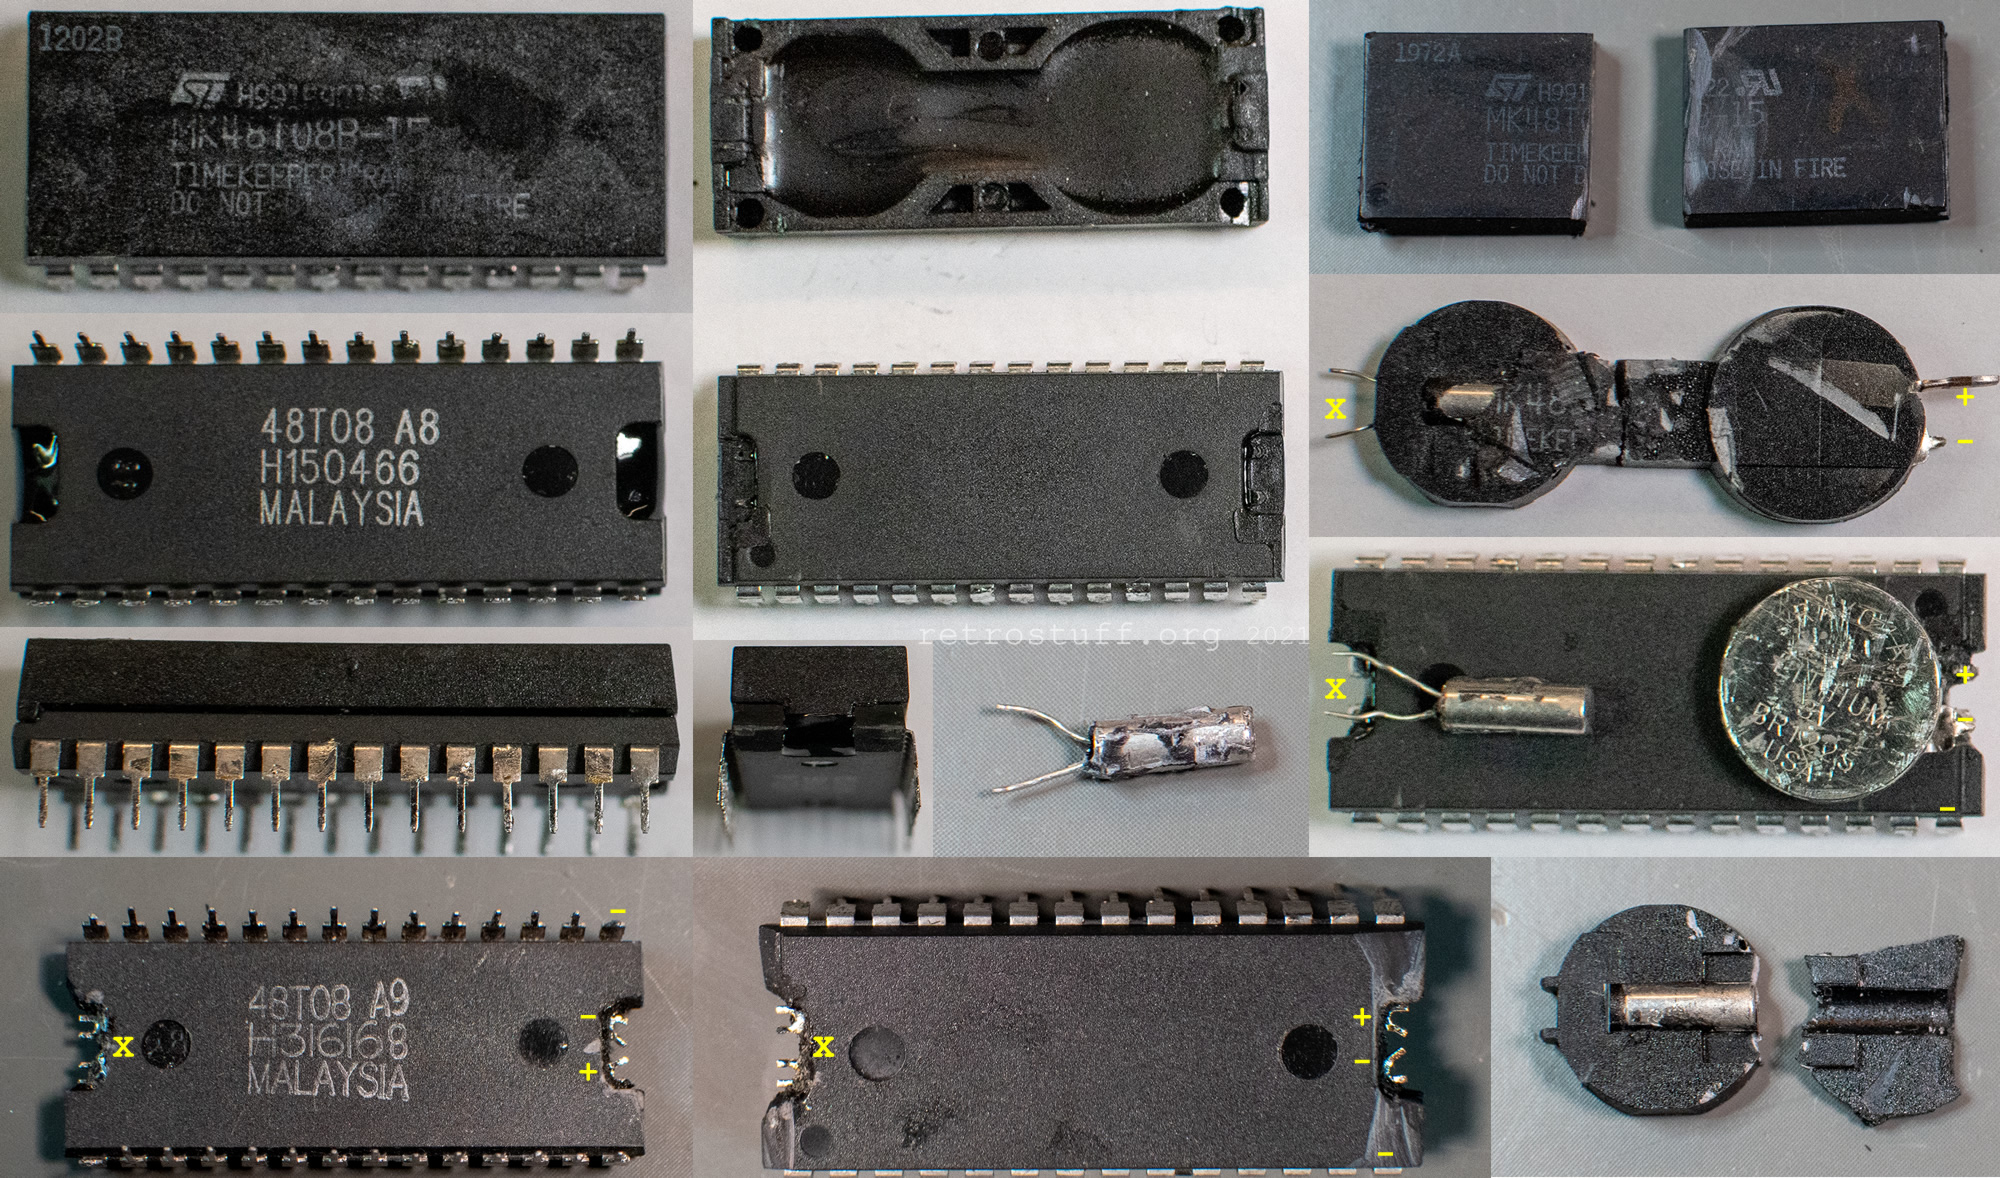
Last, I solder the crystal to the contacts on the left and a new battery (or battery socket) to the contacts on the right.
M48T08 (new)
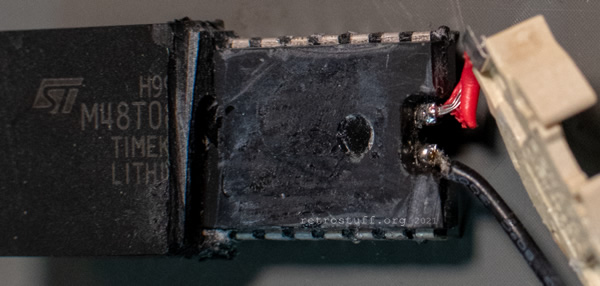
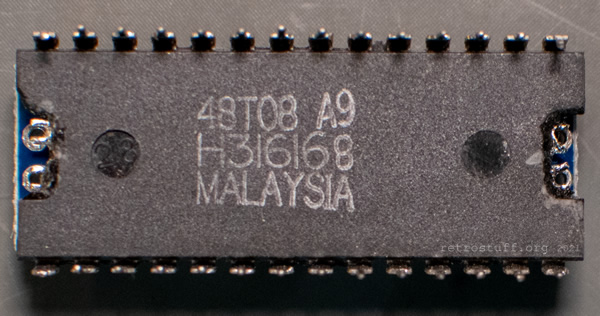
The STMicroelectronics M48T08-150PC1 Timekeeper SRAM chips are basically the same as the old chips, but everything is encapsuled in a cap hat. This adds to the physical size of the chips and obfuscate the pins which makes it harder to remove them when soldered from both sides.
Availability: The chips are still being produced and can be bought from official distributors (e.g. Mouser).
Here is another collage where you can see the different layers and how much you have to remove to dig out the actual chip and battery contacts:
It is also possible to remove only the right side of the cap hat and install a battery socket.
Alternatives
- The Dallas / Maxim DS1643 NV Timekeeping RAM chips are 100 % compatible with the Timekeepers. The RTC in these chip does not need to be calibrated; calibration data is ignored.
Availability: The chips are no longer being produced (EOL).
Dallas chips have the battery buried in the epoxy on the bottom; known Timekeeper hacks cannot be applied here.

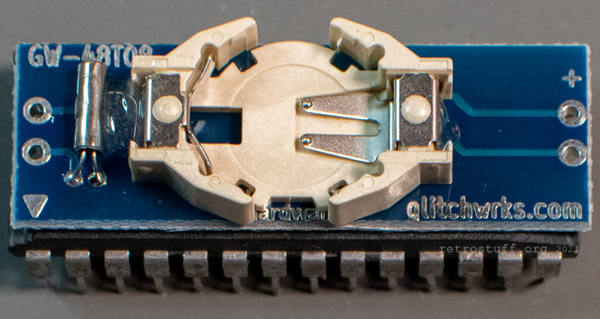
- The Glitch Works GW-48T08-1 Repair Board Module is a replacement for the top hat of the old Timekeepers. Further details about a similar board for smaller chips can be found here: GW-48T02-1.
Availability: These are still being sold in their Tindie store.
The contacts align perfectly and can be connected with straight wires (or the old connectors if you leave them inside). If you ‘undress’ a newer Timekeeper with a Dremel, it will fit too.
- Another replacement for the top hat is TimeKeeper- by CabriDIY. You can download the Gerber files on GitHub and have them made by a PCB manufacturer of your choice. Here are some impressions with different battery sockets. Note that this is v1.0 with errors on the silkscreen – a corrected v1.1 has been released in the meantime.
32 KB (SmartWatch)
Not everybody knows that there are Philips CD-i players without Timekeeper chips and that often leads to confusion. If you see something like this in your CD-i player then better leave it alone – removing the SRAM chip from the socket will instantly delete your data. Also, do not attempt to put an 8 KB Timekeeper into that socket!
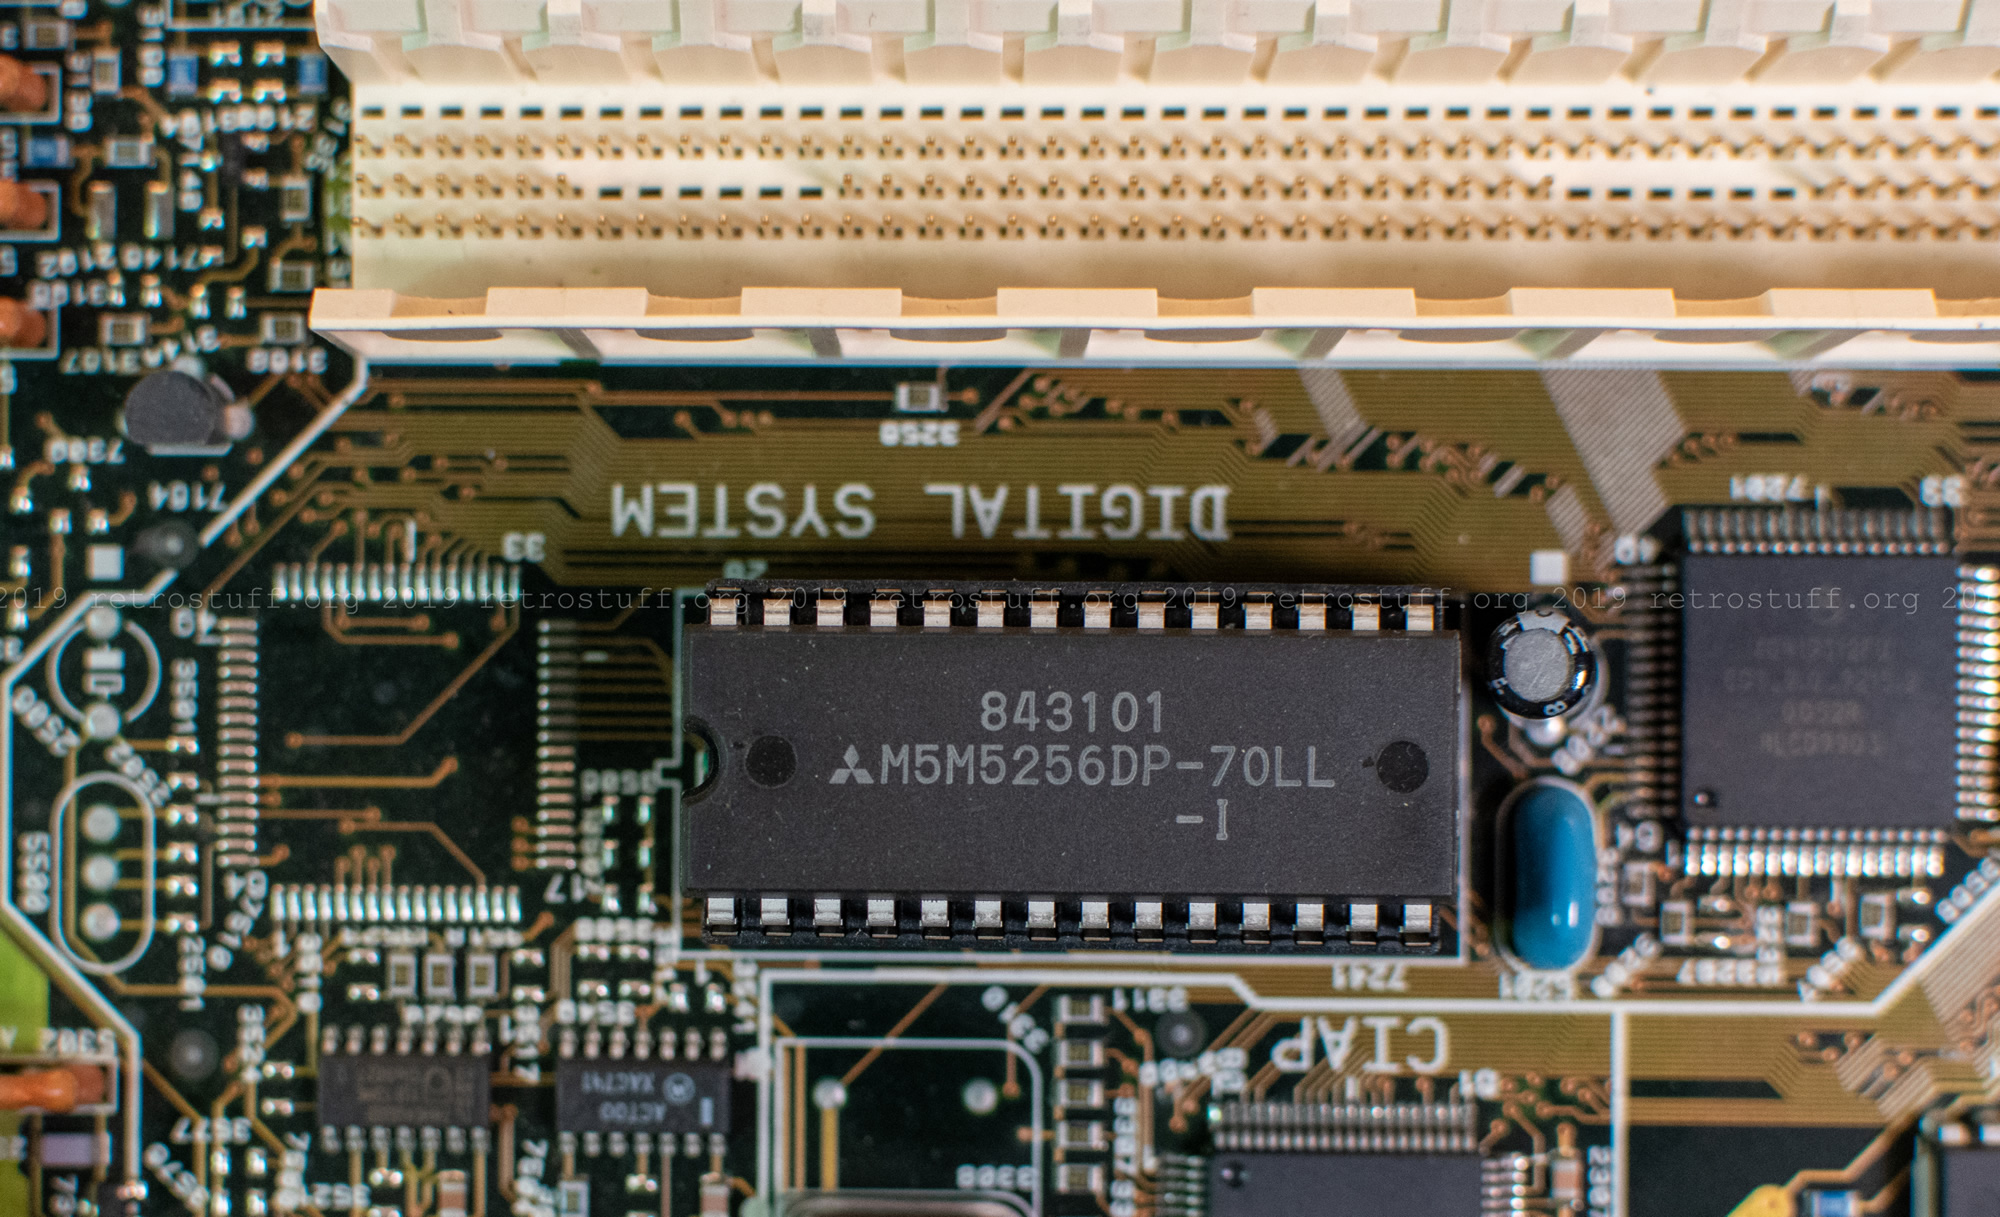

High-end consumer and professional players from Mono II and onwards have a 32 KB NVRAM+RTC solution. That includes some CDI220, 470 and all CDI490, 615, 660, 670, 740.
It consists of a Dallas/Maxim DS1216C SmartWatch RAM socket with a 32 KB* SRAM chip (e.g. Mitsubishi M5M5256DP-70LL-I 32Kbx8) on top.
Availability: The sockets are no longer being produced (EOL).
(* If you have a CDI601 or 602, you’ll find an 8 KB SRAM chip on top. Please read the 8 KB (SmartWatch) section.)
The RTC in the SmartWatch socket operates with an accuracy better than ± 1 minute per month at 25 °C and does not need to be calibrated.
For information about battery life, please check the 8 KB section.
So far, all sockets that I have seen had two batteries and most of them are still working fine. But it is just a matter of time until they start to fail.
Generic tips
My preferred solution is to replace each failing socket with a 28-pin IC socket (to make future replacements easier; see the Socket chapter in the 8 KB section) and a new alternative chip. Only buy the chips from the manufacturer or official distributors. Avoid buying “new” (i.e. old or fake) SmartWatch sockets on eBay or AliExpress, even if the price is much lower!
The removal of the old socket needs fresh solder and plenty of flux, a powerful desoldering gun, desoldering wick and also a lot of patience because some (or all) pins are always soldered from both sides. A successful extraction can be seen in this article.
It is also possible to hack new batteries to broken sockets:
Here and here are tutorials for installing an additional battery to the similar DS1216E ROM sockets and I’ve received feedback about several successful installations to DS1216C RAM sockets without disconnecting/removing the old battery (or batteries) first.
Mind that there are warnings on the tutorial pages and I strongly advise to follow them.
Interesting: An Arduino project to read and set date/time on a DS1216.
Alternatives
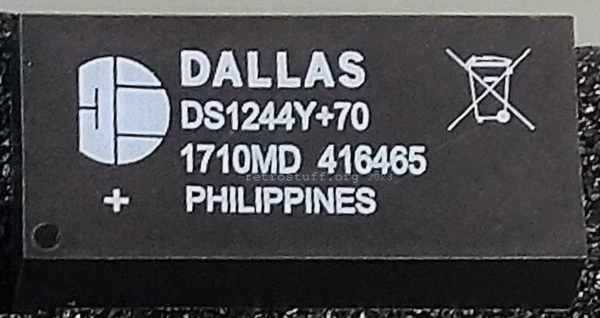
- Maxim recommends to replace the socket with a DS1244Y-70+ 256k NV SRAM with Phantom Clock.
Availability: The chips are still being produced and can be bought from official distributors (e.g. Mouser).
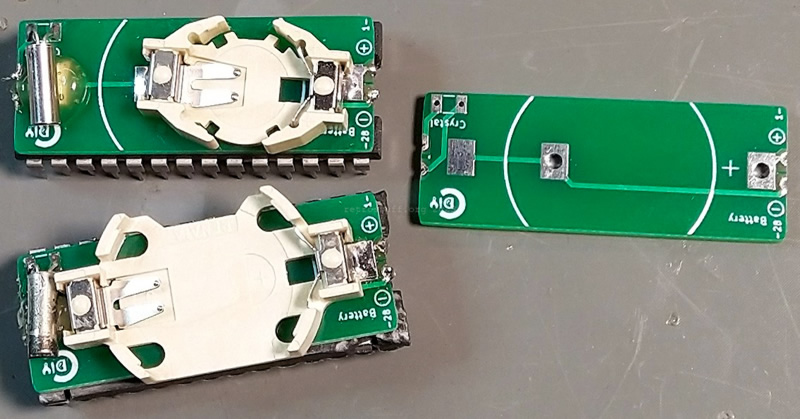
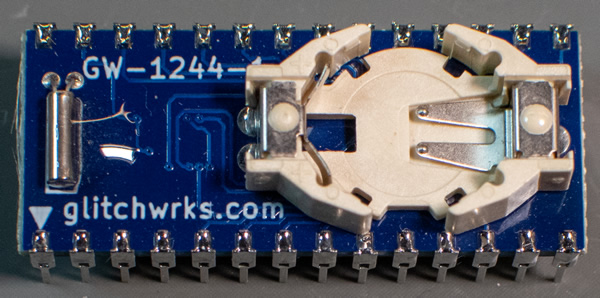
- An alternative for the DS1244Y is the Glitch Works GW-1244-1 Replacement Module.
Availability: These are still being sold in their Tindie store.
- An alternative for the 32 KB SRAM chip is this FRAM replacement by Matthias:
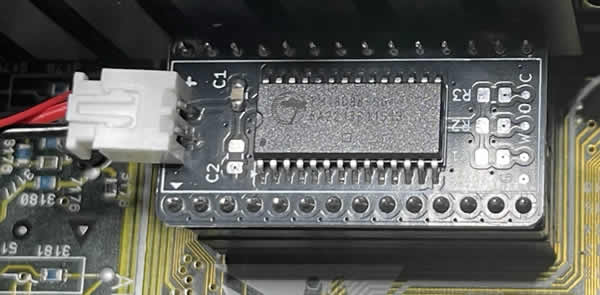
The Gerber files can be downloaded here. In addition to an FM1808, you’ll also need 0,1 µF or 1 µF for C1/2 (0805) and 10 kΩ for R1/2/3 (0805), as well as a connector to attach +5 V. The jumper on the back is provided in case someone does not want to use an external power supply (however, this also causes the batteries in the SmartWatch socket to discharge and has not yet been tested).
Note: This is only a replacement for the SRAM chip to keep your files safe – you will still need a working SmartWatch socket to keep the clock running!
(Photo and Gerber files courtesy of Matthias.)
8 to 32 KB upgrade
Please read the following articles about the first successful upgrades from 8 KB (Timekeeper) to 32 KB (SmartWatch) and a lot of background information:
- Mono IV (small)
Article: Philips CDI470 32 KB NVRAM Upgrade.
Hardware changes: Jumper settings.
Software changes: 490 system ROM. - Roboco
Article: Philips CDI450 32 KB NVRAM Upgrade.
Hardware changes: Add missing address lines.
Software changes: Custom 450 system ROM.
To-dos:
- Mini MMC
All first-generation consumer and professional players have 8 KB only. - Mono I
I have yet to find out more about the mysterious Motorola chip mentioned in the CDI220 Mono I service manual. - Mono II, III, IV (large)
Upgrades for all CDI210 (and 200).
Other solutions
8 KB (SmartWatch)
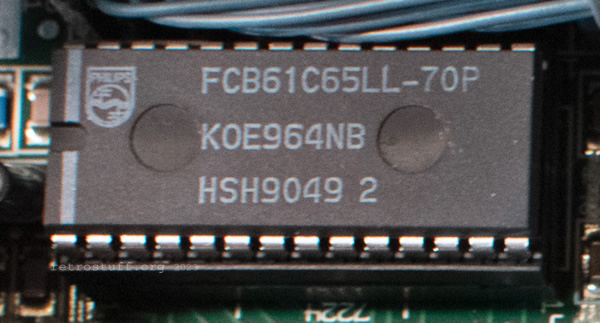
This solution can only be found in the early professional players CDI601 and 602 with Maxi MMC mainboard:
It consists of the already known Dallas/Maxim DS1216C SmartWatch RAM socket with an 8 KB SRAM chip (e.g. Philips FCB61C65LL-70P 8Kx8) on top.
Availability: The sockets are no longer being manufactured (EOL).
For more information about the SmartWatch RAM sockets and tips on how to deal with them, see the 32 KB (SmartWatch) section above.
Alternatives
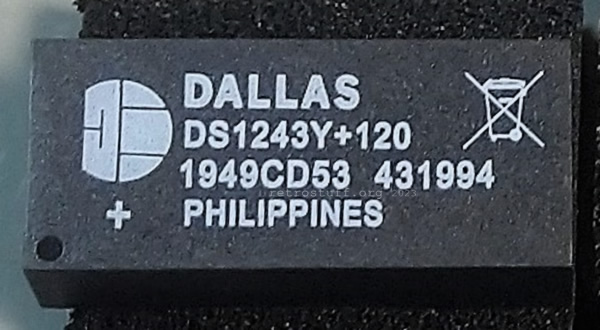
- Maxim recommends to replace the socket with a DS1243Y-120+ 64k NV SRAM with Phantom Clock.
Availability: The chips are no longer being manufactured (EOL).
8 KB (external battery)
CD-i players by Kyocera and Sony use completely different solutions:
- The Kyocera mainboard has a Sony CXK5864CM-10LL CMOS SRAM and a Ricoh RP5C15 Real-Time Clock, powered by a Sanyo LiMnO2 rechargable cell* soldered to the mainboard.
(*exact type unknown, probably ML2430.)
- The Sony mainboards have a Sony CXK5864BM-12LL CMOS SRAM and a real-time clock (included in the Sony CXD8293Q Master Controller), powered by a CR2032 battery in an accessible battery holder on the bottom.
32 KB (external battery)
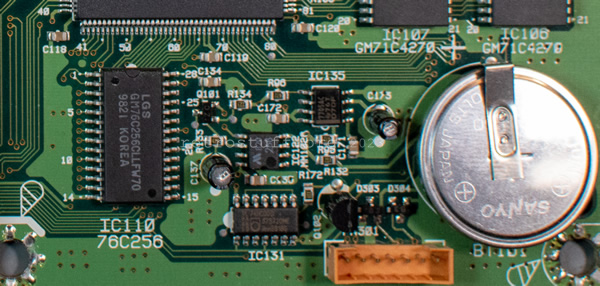
CD-i players with the GoldStar / LG boards also use different solutions:
An LGS GM76C256*LLFW70 CMOS SRAM and an Epson RTC-4513 Real Time Clock Module, powered by an external coin cell battery.
- Midi-size players such as GDI-700M and DVS VE-200 have a CR2450 battery soldered onto the mainboard.
- Portable players such as GPI-1200M and CDI370 have a CR2032 battery in an accessible compartment on the bottom.

Alternatives
Install a battery socket in the midi-size players and replace the battery if necessary.
Changelog
2021-12-31: Completey reworked version of the NVRAM section.
2023-02-10: Added two lesser known solutions: 8 KB (SmartWatch) and 32 KB (external battery). Minor additions and corrections.
2023-06-09: Added two solutions with 8 KB (external battery).
2023-10-09: Added more photos and information about sockets, checking/calibration the clock crystal and another replacement of the Timekeeper top hat.
2025-11-25: Added FRAM replacement for the 32 KB (SmartWatch) SRAM chip.
Clarification: the DS1244Y *IS NOT* pin compatible with the DS1643, so the GW-1244-1 is also not compatible. Maxim’s recommendation is to rework your design. (Verified with Glitch Works). GW mentioned they might make a DS1643 / M48T08 drop-in replacement in the future.
Well, that’s correct, but I think you are mixing up the 8 and 32 KB solutions.
DS1244Y (and GW-1244-1) are pin-compatible replacements for DS1216C (32 KB).
DS1643 (and GW-48T08-1) are pin-compatible replacements for M(K)48T08(B) (8 KB).
I’m very much a noob when it comes to the technical stuff for the CD-i, so I apologize for any imprecise words.
I have a 220/57 with a dead 32kb nvram chip. If I got it replaced with a GW-1244-1 would the player ‘recognize’ the chip automatically or would you need to do any other steps beyond just removing the old chip and installing the new one?
Thanks so much for all your articles!
Just replace the old chip (and socket!) with a GW-1244-1 and it will work immediately. I recommend to install an IC socket as well, just in case something goes wrong and/or you have to revert to the old solution.
Thank you for the kind feedback!
That’s great to hear!
Will any 28 pin ic socket be good or is some specific type needed? I know nothing about ic socket and see a lot different looking products when I Google them. 😅
Any 28-pin IC socket with standard width is fine.
Really appreciate it man!
I didn’t replace the socket in my 220/60 and just put a DS1244Y-70+ 256k NV SRAM with Phantom Clock in the old socket and it works.
hey just want to say thank you so much for the skill and effort on this post very much appreciated
Hi, I did a battery hack on my Magnavox 200 CDI. All good.
My question is, I have another CDI a Philips 220/57. Where the timekeeper is suposed to be, it has the Mitsubishi M5M5256DP-70LL chip. It is socketed and if I pull it, there is another chip under it. I’m confused as to where the memory is stored. This is not a timekeeper, right?
Right, that’s not a Timekeeper. Please read the 32 KB (SmartWatch) section of this article.