
This article is a follow-up to my article from 2013 and explains how connect a Philips CD-i player to a modern Windows PC and how to back up and restore NVRAM data with CD-i Link. The other option CD-interlink is covered in this article.
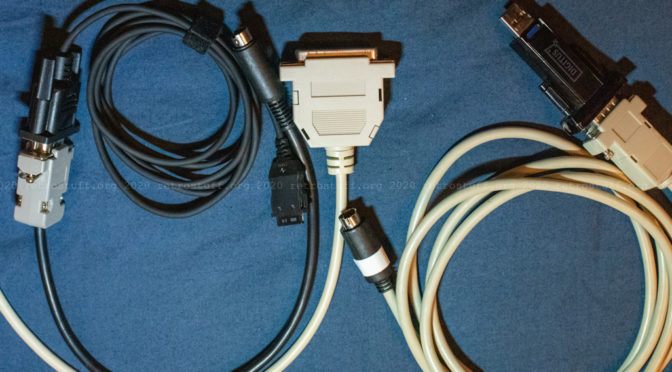
Back then, I built a null-modem cable which I still use today. Over the years I’ve used it to connect all my CD-i players to PCs and portable devices for data transfer and debugging purposes. However, some models required additional adapters and/or different connectors.
Cables and setup
For most Philips CD-i players you will need to make a null-modem cable with Mini-DIN-8 and DE-9F connectors according to the CD-i Nullmodem Cable Specification found on this page. The Mini-DIN-8 connector goes into the back port of the player (usually labelled INPUT 2, RS-232 or SERIAL I/O).
Top-loading players such as the CDI450 (Roboco) and even the FW380i Mini System (Mono III-based) have only one port and require an I/O Port Splitter. If you don’t have a port splitter, you can modify the null-modem cable by bridging pins 1 and 2 of the Mini-DIN-8 connector (thanks, CD-i Fan). Note that this hasn’t been tested with all other models and may give unexpected results.
Early professional and authoring players such as the CDI602 and 605T (Maxi MMC and Mini MMC) require a null-modem cable with DE-9F connectors on both ends. One connector goes into port 3 on the back of the player. See also this article.
Midi-size GoldStar / LG players require a cable with a DE-9F and a DB-25F connector. The DB-25F connector goes into the MODEM port on the back of the player. See also this article.
USB to serial adapter
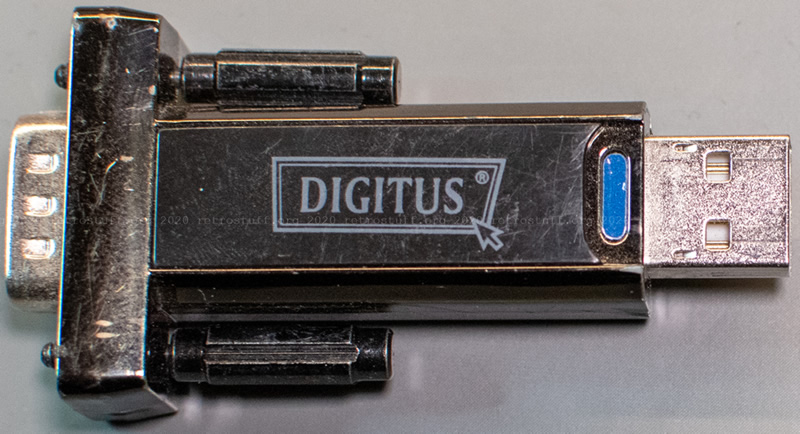
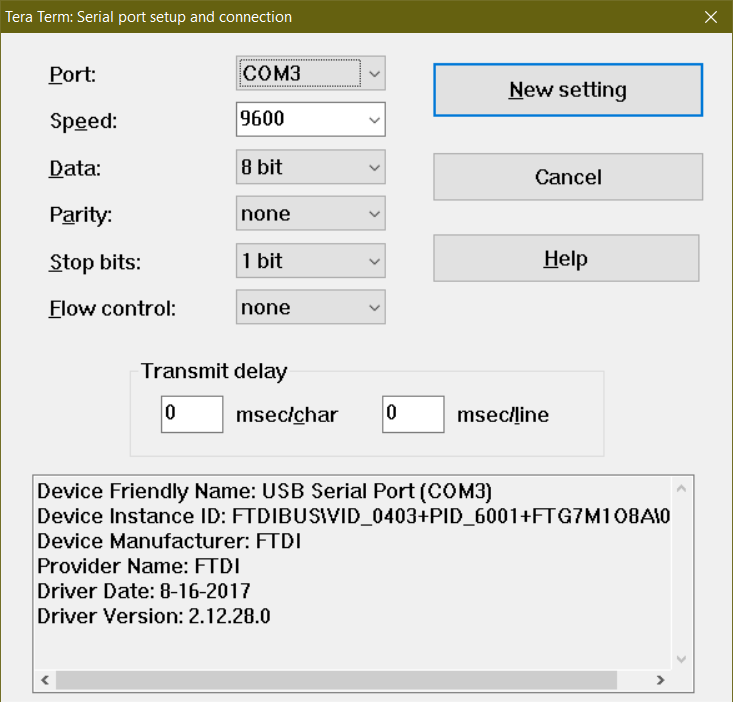
Almost no modern computers have a built-in serial port anymore. A cheap USB to serial adapter will work fine; for example, the DIGITUS DA-70156 with an FTDI FT232RL UART chip. Windows 10/11 will instantly recognise it and install the necessary drivers.
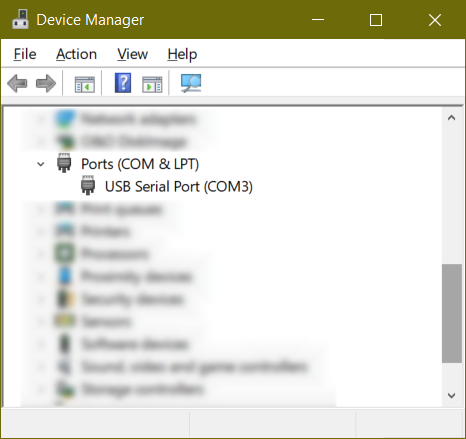
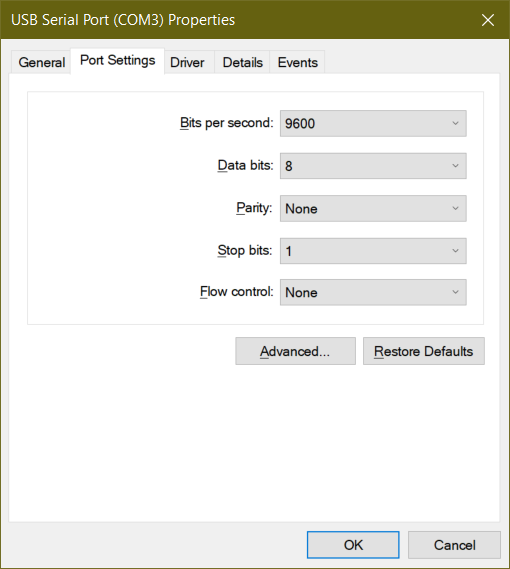
Check the Windows Device Manager to see if the adapter is installed and note the port number. The default setting (9600/8-N-1) is exactly how it should be set up.
Function test
Note: This test is not relevant for CDI60x professional and authoring players as port 3 will not respond to it. You can still access the Low-level test via port 2 if you wish.
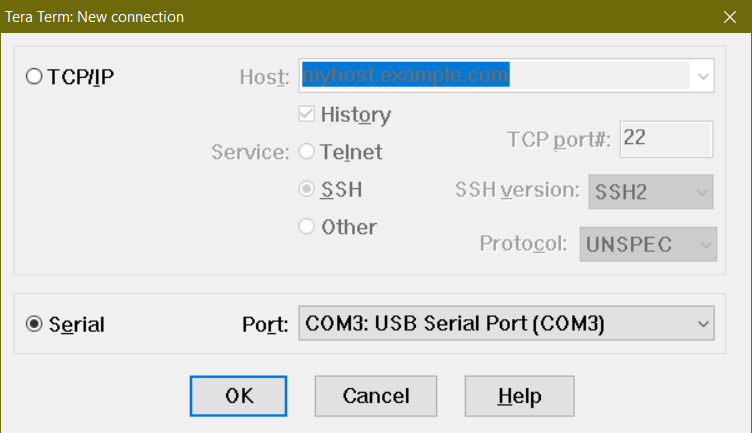
For a quick function test, we need a terminal emulation program. Since HyperTerminal is no longer included with Microsoft Windows, we will use the open-source program Tera Term instead. Again, check the settings and then connect to the serial port.
Once connected, hold down the space bar and switch on your CD-i player. If everything works as expected, it should display a low-level test menu.
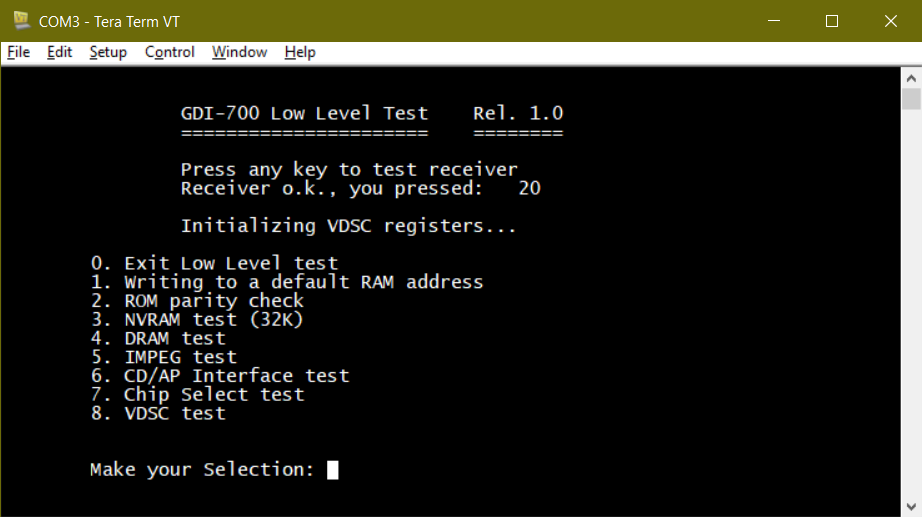
If not – check the cable, adapter and settings again until you can access the low-level test. Then make sure you close Tera Term and any other programs accessing the COM port and continue with the next section.
CD-i Link
CD-i Link (cdilink) is written by CD-i Fan, the author of the CD-i Emulator. It is a fast and versatile command-line tool with plenty of options for all your back up and restore needs. In this article I will only focus on the file transfer options. At the end you will find some other useful options, e.g. for dumping ROM files. If you want to explore all the options: The program archive contains extensive documentation.
cdilink communicates with CD-i players using the “stub” protocol. Philips CD-i players (except the CDI370 manufactured by LG) already have a subset of this protocol built-in and download the full program when connected to a host computer running cdilink. The original ROM download protocol is documented in the CDI605(T) technical documentation on ICDIA.
Most non-Philips CD-i players (including the CDI370) can still communicate with cdilink when cdistub is started from a disc – the disc image is available here and here. All you need to do is run the initial command with the -n[ostub] option and press play when prompted.
Initial command
This command is crucial to initiate the connection. For most CD-i players there will be no problem at all, but there are a few exceptions, which are explained below.
Run this command first and then switch on the player when prompted to reset your CD-i player:
cdilink -p 3 -k
–p[ort] 3 uses the serial port #3. Change it to the port number that you have found in the Windows Device Manager.
-k[eep] keeps the program active for further commands.
C:\cdilink\>cdilink -p 3 -k
CD-i Link version 0.5.2
Please reset your CD-i player!
Waiting for stub...
Downloading cdistub...
000087CC
Ending download stub...
CD-i Stub version 0.5.1
Done!
If you have got this far, skip to the next section.
Now for the exceptions – most of the time you will be stuck at Waiting for stub, this can happen for a number of reasons:
- Maxi MMC and Mini MMC players (professional CDI60x / consumer 205, 220/00, 910) can be very hard-to-convince to make the connection. They actually want you to reset the player after running the command. Just switching them on will get you stuck.
The trick is to run the command after the player has been turned on and the player shell has been displayed. Then, you will have to find a way to reset the player. For some (CDI601, 602 and 605) this is very easy, as they have a Return to zero ▷0◁ button on the front. For all others, you can trigger a reset by either playing a CD-i and then ejecting the tray or by switching the power off and on in quick succession – you’ll probably need to try this a few times to get the timing right. - You have a non-Philips CD-i player (including the CDI370) and have forgotten the -n[ostub] option? Don’t worry, just start the disc a second time to continue.
CD-i Link basics
You want to back up a file from the NVRAM but don’t know what the file is called? Use this command to figure it out:
cdilink -p 3 -c -di /nvr
-c[continue] continues the session that we started with the first command.
-di[rectory] /nvr displays the names of the files that are stored in the NVRAM.
C:\cdilink\>cdilink -p 3 -c -di /nvr
CD-i Link version 0.5.2
Checking for stub...
Listing /nvr directory...
LSN    Name
------ -----
    53 player_shell_settings.prf
   189 7th_Guest
  1221 csd

Done!
You have identified the name of the file. Use this command to copy it to your PC:
cdilink -p 3 -c -uc /nvr/7th_Guest
-u[p]c[opy] /nvr/7th_Guest copies the save file of the game The 7th Guest from the CD-i player into the current directory of the host computer.
C:\cdilink\>cdilink -p 3 -c -uc /nvr/7th_Guest
CD-i Link version 0.5.2
Checking for stub...
Upcopying /nvr/7th_Guest...
Done!
To delete the file from the NVRAM, use this command:
cdilink -p 3 -c -del /nvr/7th_Guest
-del[ete] /nvr/7th_Guest deletes the file 7th_Guest from the NVRAM of the CD-i player.
C:\cdilink\>cdilink -p 3 -c -del /nvr/7th_Guest
CD-i Link version 0.5.2
Checking for stub...
Deleting /nvr/7th_Guest...
Done!
To copy the file back to the NVRAM, use this command:
cdilink -p 3 -c -dc /nvr/7th_Guest
-d[own]c[opy] /nvr/7th_Guest copies the file 7th_Guest from the current directory of the host computer into the NVRAM of the CD-i player.
C:\cdilink\>cdilink -p 3 -c -dc /nvr/7th_Guest
CD-i Link version 0.5.2
Checking for stub...
Downcopying /nvr/7th_Guest...
Done!
Up and down indicate the direction of the transfer. upcopy transfers files from the CD-i player to the host computer while downcopy transfers files from the host computer to the CD-i player.
Caution:
Files with the same name will be overwritten without confirmation!
Files will be deleted without confirmation!
If a file is write-protected (very rare), OS-9 error 000:214 will be displayed.
When you are done copying files, simply turn off the player. Alternatively, you can run this command:
cdilink -p 3 -c -e
-e[nd] ends the session and resets the player.
C:\cdilink\>cdilink -p 3 -c -e
CD-i Link version 0.5.2
Checking for stub...
Ending stub...
Done!
CD-i Link advanced
To automate the whole process, you can save a list of files names to a batch file and add upcopy or downcopy options. This will allow you to back up or restore the entire content of the NVRAM with a single command. Here’s a sample batch file to get you started. Note the placement of quotation marks; they are mandatory when a file name contains a space.
cdilink -p 3 -k
cdilink -p 3 -c -uc /nvr/7th_Guest
cdilink -p 3 -c -uc /nvr/Apprentice
cdilink -p 3 -c -uc /nvr/BURNCYCLE_A
cdilink -p 3 -c -uc /nvr/cdi_Tetris
cdilink -p 3 -c -uc /nvr/Lost_Eden_game1
cdilink -p 3 -c -uc "/nvr/Xplora 1"
cdilink -p 3 -c -uc /nvr/csd
cdilink -p 3 -c -uc /nvr/player_shell_settings.prf
cdilink -p 3 -e
I’ve used batch files like that to fill and compare the contents of the NVRAM while I was working on the NVRAM upgrade.
Over the past few years I’ve written a more advanced Windows batch script, which I’ve introduced and explained in this article.
More useful options:
-roms – this will upload the ROMs of the CD-i player and the DVC into the current directory to the host computer.
-info[rmation] – this will write a text file with lots of information about the CD-i player into the current directory of the host computer.
-i[nteractive] – this will start the interactive command mode. You can enter all options directly as commands.
-q[uit] – ends the interactive command mode.
History
2020-04-03: Initial version published.
2023-03-18: Minor changes and additions.
2025-04-17: Completely rewritten article; added details on cables and troubleshooting for more player models.
The original ROM download protocol is documented in the CDI 605 and CDI 605T technical documentation that is now on ICDIA here: http://www.icdia.co.uk/techdocs/index.html.
I actually “retconned” that protocol into my “stub” protocol when I wrote cdilink in 2005. The protocol should have been included with the cdilink distribution as “stub.txt” but it appears to have been accidentally omitted. I will rectify that for a future version.
All Philips players have the download protocol in ROM. At the time I wrote cdilink I thought that non-Philips players would still have serial port handling sufficiently like the Philips ones that just starting cdistub from a CD-i disc would work, but that has turned out to be not the case. The Sony players and the Kyocera are supposed to have a serial port, but I have so far been unable to figure out how to use them with cdistub.
Thanks for the information, I will add some of it to the article later.
What about the Portable CD-i Board / MC68341 Integrated CD-i Engine? I could swear that I’ve used cdilink with my DVS VE-200 without disc before. Now, it just gives me the OS-9/68K System Bootstrap and won’t proceed until I insert the disc and use the -nostub option.
Noob here with a noob question. I’m hoping to backup the save files for my games and I’ve got everything set up so that on Windows 10 I’ve got the Low Level Test displaying. I then open up CDi Link and get a list of commands that says press any key to continue at the bottom, but when I do, it just exits the program.
Is there a step I’m missing? Should I first be selecting one of the options in the Low Level Test?
The Low-Level Test is not needed for data backup. But shows you that your connection is working, which is a good start!
cdilink is a command-line program – if you just double-click on it, it will display a bunch of text and exit when you press a key.
You have to extract it first (e.g. into the directory where you want to save your files in).
Then, start the Windows Command Prompt (cmd.exe), navigate to the directory with cdilink and run it from there.
Thanks! I think I’m getting closer. I was able to get cdilink to run, but when I type out the command, I get the following message:
EscapeCommFunction RESETDEV
SetCommTimeouts
Cannot change baudrate to 9600
Under device manager, the port speed is listed at 9600 the same as in your example photo. Any idea what I’m doing wrong?
Which CD-i player do you have? (model/version)
Did you turn the player off before running the first cdilink command? Turn it on again when you’re asked to reset the player.
Philips 220/97C. I turned it on while holding spacebar in the Tera Term app to bring up the Low Level Test, but kept it as-is after that. Went into cmd and, to simplify things, put the cdilink files into the default directory cmd begins with. Typed out the cdilink -p 4 -k command (my port was COM4 instead of 3) and got the message about the baudrate.
Ok, your player should be fine with cdilink.
The problem here is Tera Term – only one program at a time can access a serial port.
Please close it and also turn the player off, then run cdilink again.
That did it! You’re a genius. Thank you so much!
You’re welcome! And thanks for the feedback.
I’ll add a note about this issue the next time I’ll update this article.
Hi,
I have an issue when I want to do it.
Everything’s fine (Low-level test correctly done, etc.) until the CD-I Link step.
When I launch CDI-link.exe, It shows a list of the different possibilities (-roms :: -k :: etc.) and tell “Press any Key to continue…”
When I do so, the program stops instantly and close the cdi-link Windows…
I tried to re-install already… Not better.
Do you have any idea ?
Thank you very much.
You’ll have to launch the program from the windows command line (cmd) and not from the file explorer.
Thanks for your quick answer Rosewood but I tried already and it doesn’t work.
Windows shows an error message when I want to do do, saying something like Windows is not able to run this program (with a sub message like : “Please contact the editor of your program”) :/
I’m using windows 10, 64bits.
It will run just fine on your version of Windows (you already saw its output when you launched it with the file explorer). But I can’t help you with the command line, sorry.
No problem, thank you very much Rosewood.
I will try again… So frustrating to be blocked at this point.
If someone else has an idea…
It’s OK, I found the solution: just a stupid rights issue.
I can run it now.
Just a little additional question: Is there a way to reset the stub without turning off the CD-I?
Indeed I would like to transfer my savings after I played, to make a kind of “externalization” of my savings.
Indeed, one of my CD-I (450) has Timekeeper which is KO… I was thinking this can be a workaround…
Thanks
Great that you figured it out.
You can reset the player by opening the disc drawer (or lid on the 450), there’s no need to turn it off.
Oh ok great.
I will try it.
Thanks again for your support.
Hello Rosewood, I would like to confirm you that the process is exactly operational!!
Thnak you so much.
To be precise, the Stub proceed the resetting when you leave a game, and not exactly by opening the lid.
I tried with 2 games, for example The Lost Eden, and it worked perfectly by running the “cdilink -p 3 -k” command right before leaving the game…
When the game stops, the stub do resetting, and I can access it by CD-I link to do my external backups.
I tried back-ups and restores, and everything works perfectly.
That’s really great, I’m so happy that I found a way to avoid a Timekeeper fixing 🙂
Thank you very much Rosewood, you’re the best.
Long live the CD-I!!!
Correct. After saving your game, you can either quit the game or open the lid while the disc is still running – this has the same effect and resets the player. If you start cdilink beforehand, you can use it immediately.
For example, if you are in a hurry and don’t know the file name, run cdilink -i for interactive command mode,
then dir /nvr to find out the file name
and finally uc /nvr/filename to copy a specific file to your PC.
For next time, you can simply create two batch files for that particular game to restore and back up the files.
Good luck with your new backup solution!
But remember that the current half-dead state of your Timekeeper will not last forever.
At some point, saving will no longer be possible and the player will refuse to start until you revive it by replacing the Timekeeper.