
Changing settings in the BIOS of a japanese computer can be dangerous if you don’t have any knowledge of the japanese language or don’t what you’re doing. I don’t have that much knowledge of the language either and tried to translate the BIOS.
This is how I did it: I connected my PC-9821Xe/U7W with a sync combiner to the Framemeister and grabbed a video of the selection of each and every BIOS menu item. Then I converted the frames of the video to image files. The images were then cropped and converted into grayscale negatives to be processed by an OCR engine. Most of the output was gibberish and every single line of text needed manual processing. The japanese text was then fed into the Bing and Google translators and some common sense added to the output.
Hold down the HELP key when switching on the computer to enter the BIOS.
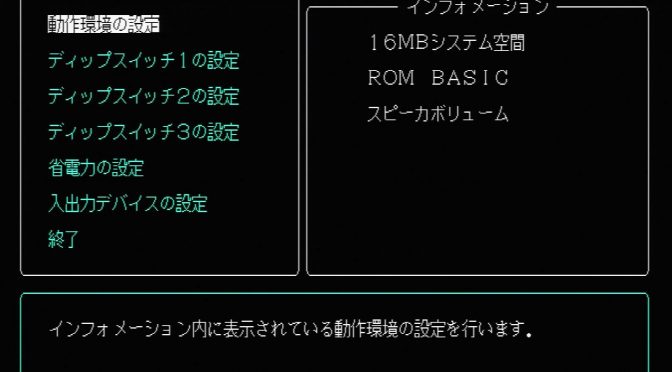
System Setup Menu – Main Menu
1. Operating Environment Settings
Information:
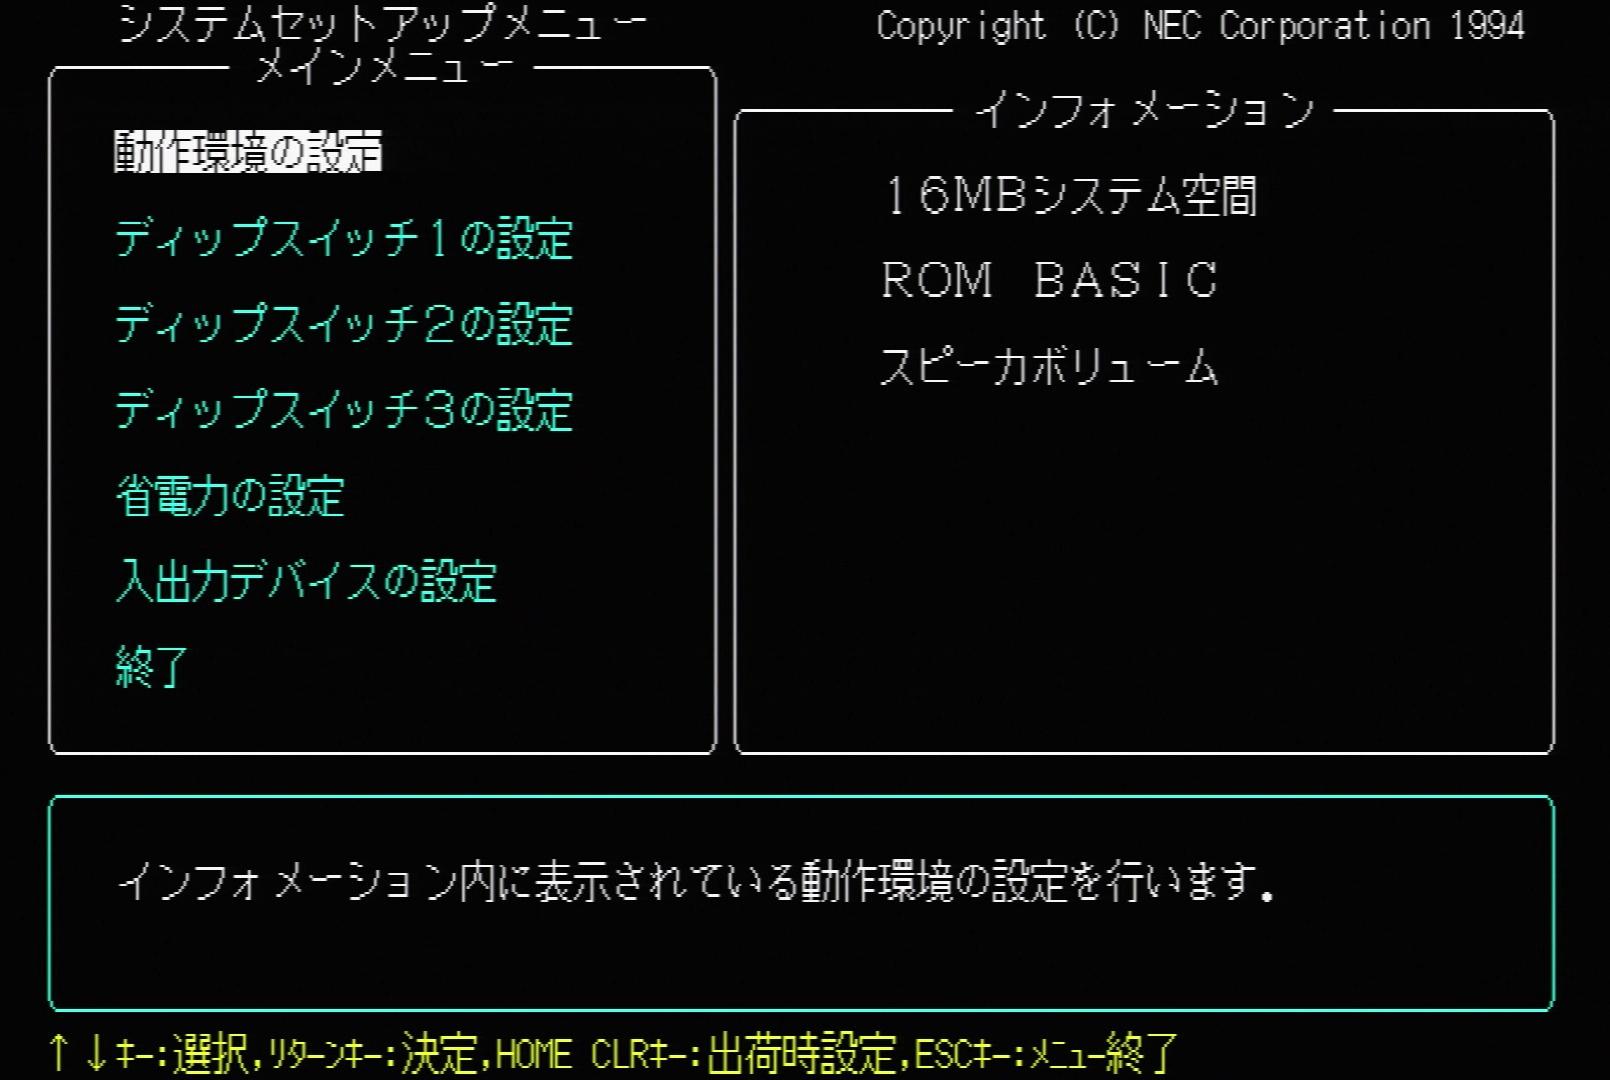
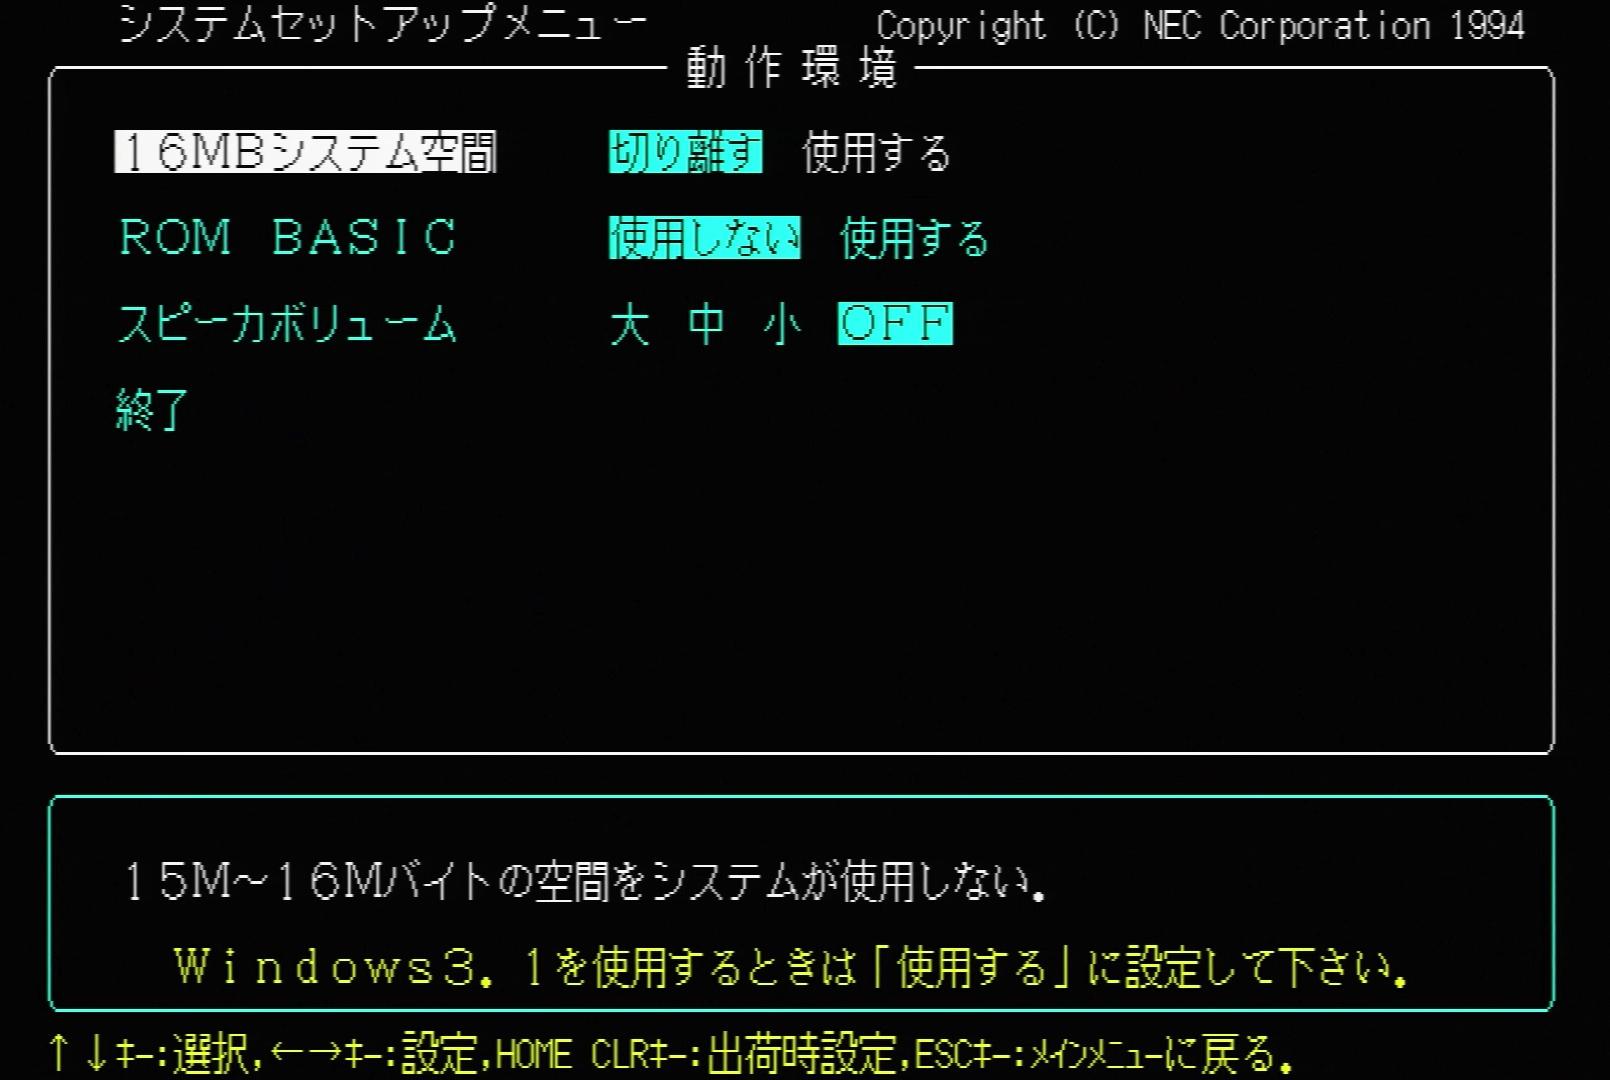
16MB Memory Hole
ROM BASIC
Speaker Volume
Hint: Configure the operating environment displayed in the information.
Keys: Up/Down: Select | Return: Decide | HOME CLR: Factory Settings | ESC: Menu End
16MB Memory Hole – Disabled | Enabled
Hints:
When using Windows 3.1 please set it to “enabled”.
1. The system does not use memory hole at 15M-16M.
2. The system uses the memory hole at 15M-16M.
Keys: Up/Down: Select | Left/Right: Set | HOME CLR: Factory Settings | ESC: Back to Main Menu

ROM BASIC – Disabled | Enabled
Hints:
1. Do not start ROM BASIC.
2. Start ROM BASIC.
Speaker Volume – High | Medium | Low | Off
Hint: Set the volume of the internal buzzer.

End
Hint: Exit the operation environment settings.
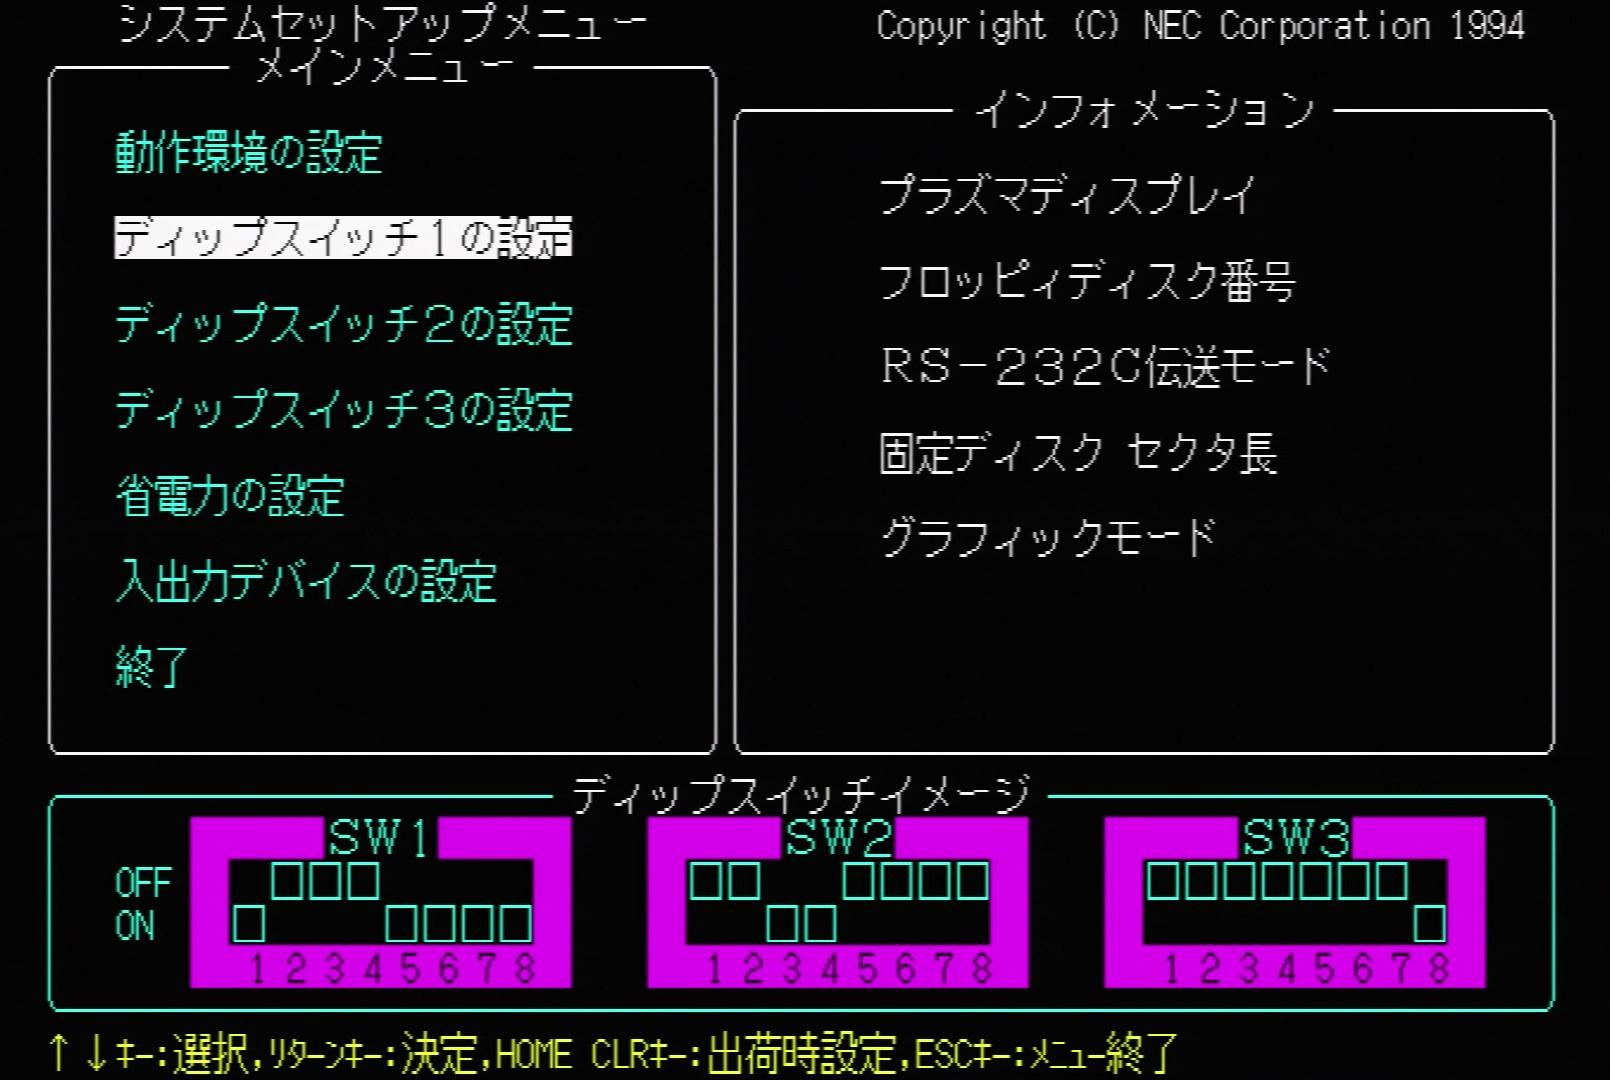
2. DIP Switch 1 Settings
Information:
Plasma Display
Floppy Disk Sequence
RS-232C Transmission Mode
Hard Disk Sector Size
Graphics Mode
DIP Switch Image
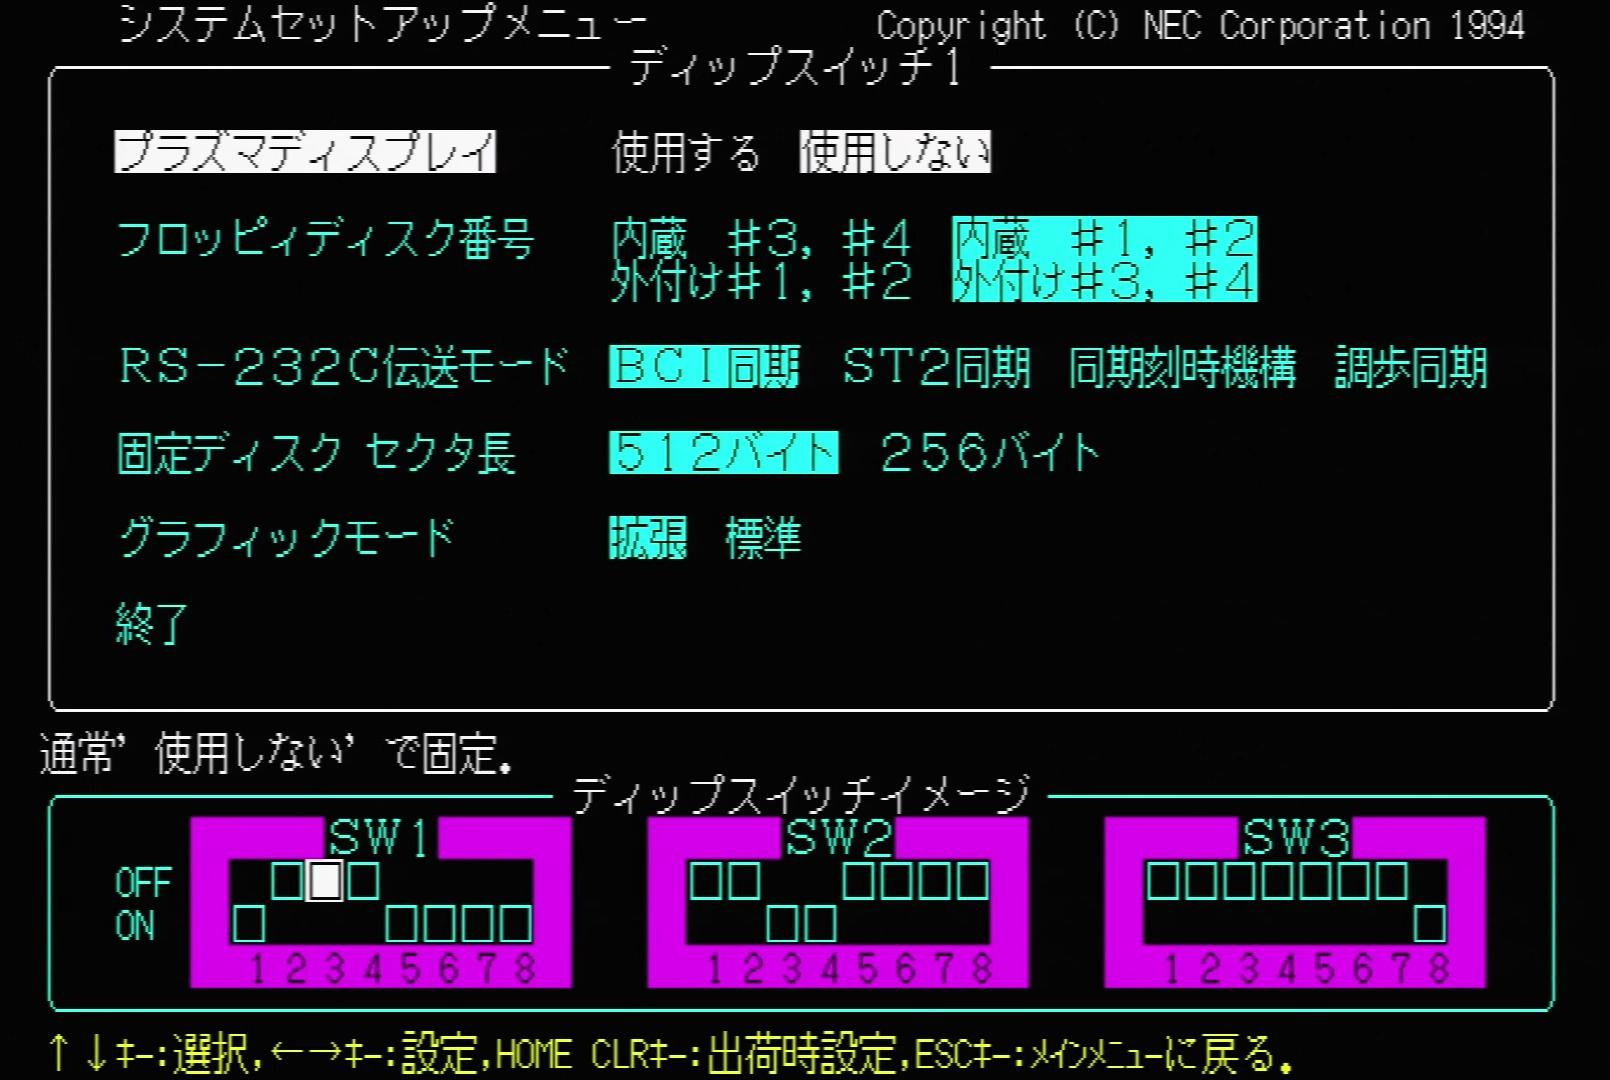
Plasma Display – Enabled | Disabled
Hint: Usually “disabled”.
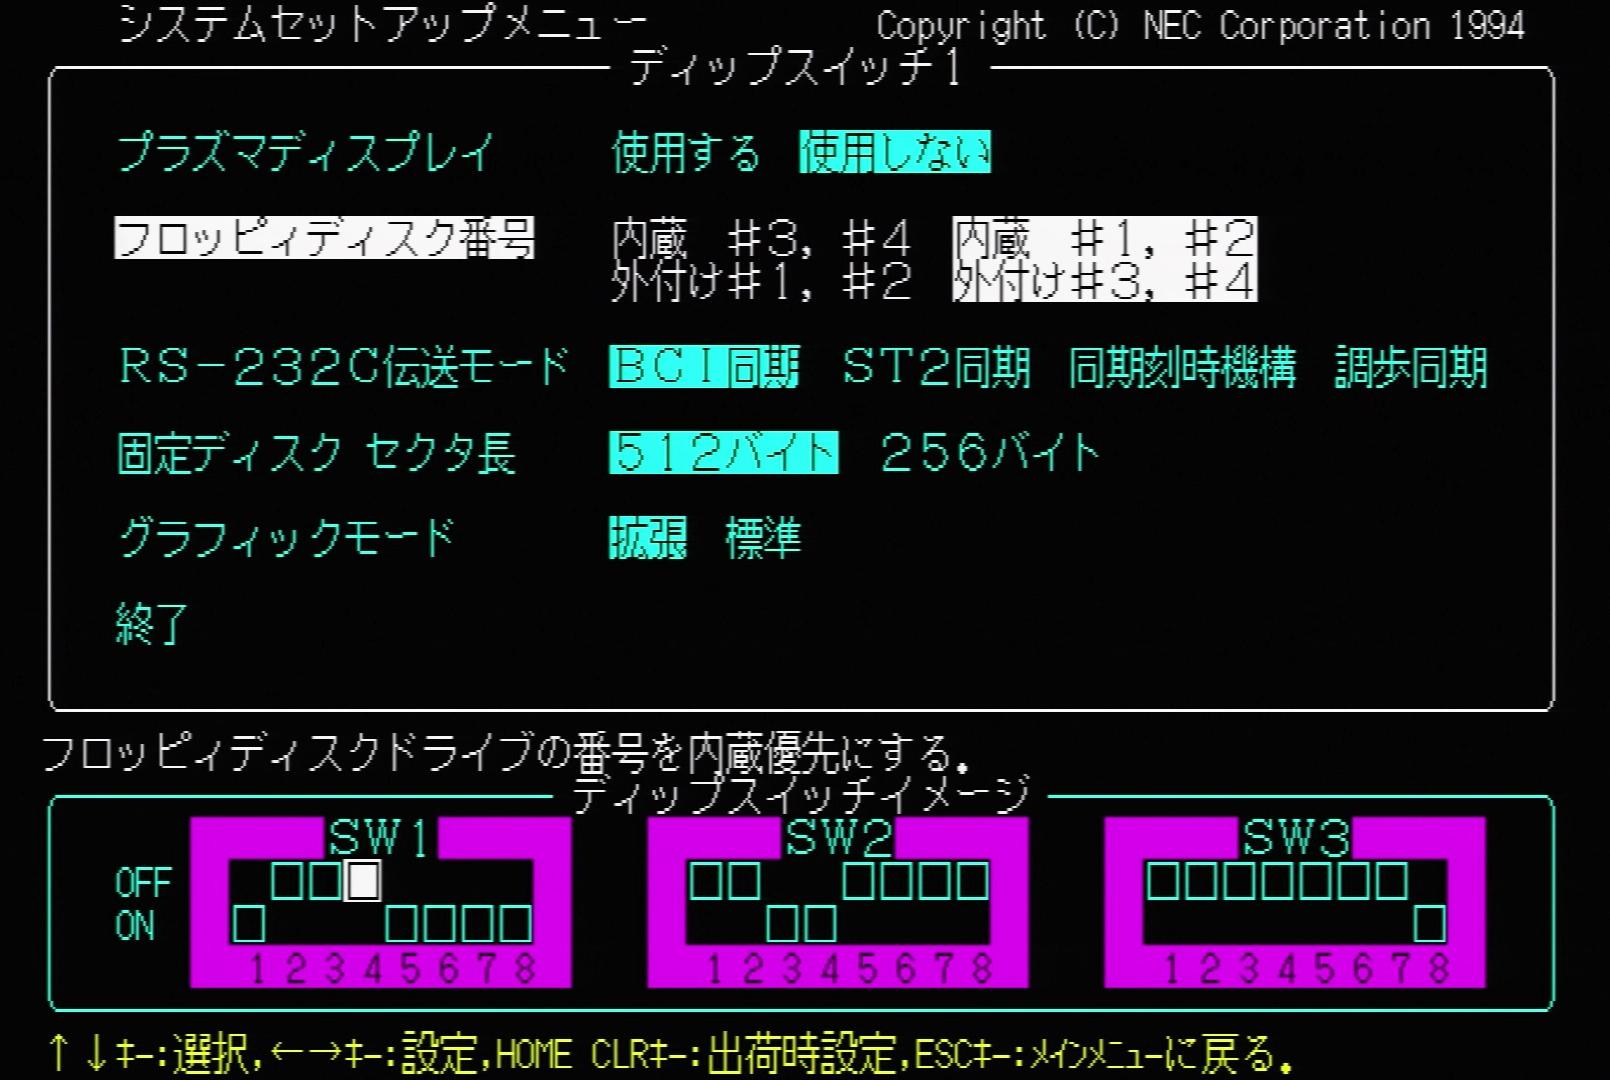
Floppy Disk Sequence – Internal #3, #4, external #1, #2 | Internal #1, #2, external #3, #4
Hints:
1. Prioritize external Floppy Disk Drives.
2. Prioritize internal Floppy Disk Drives.
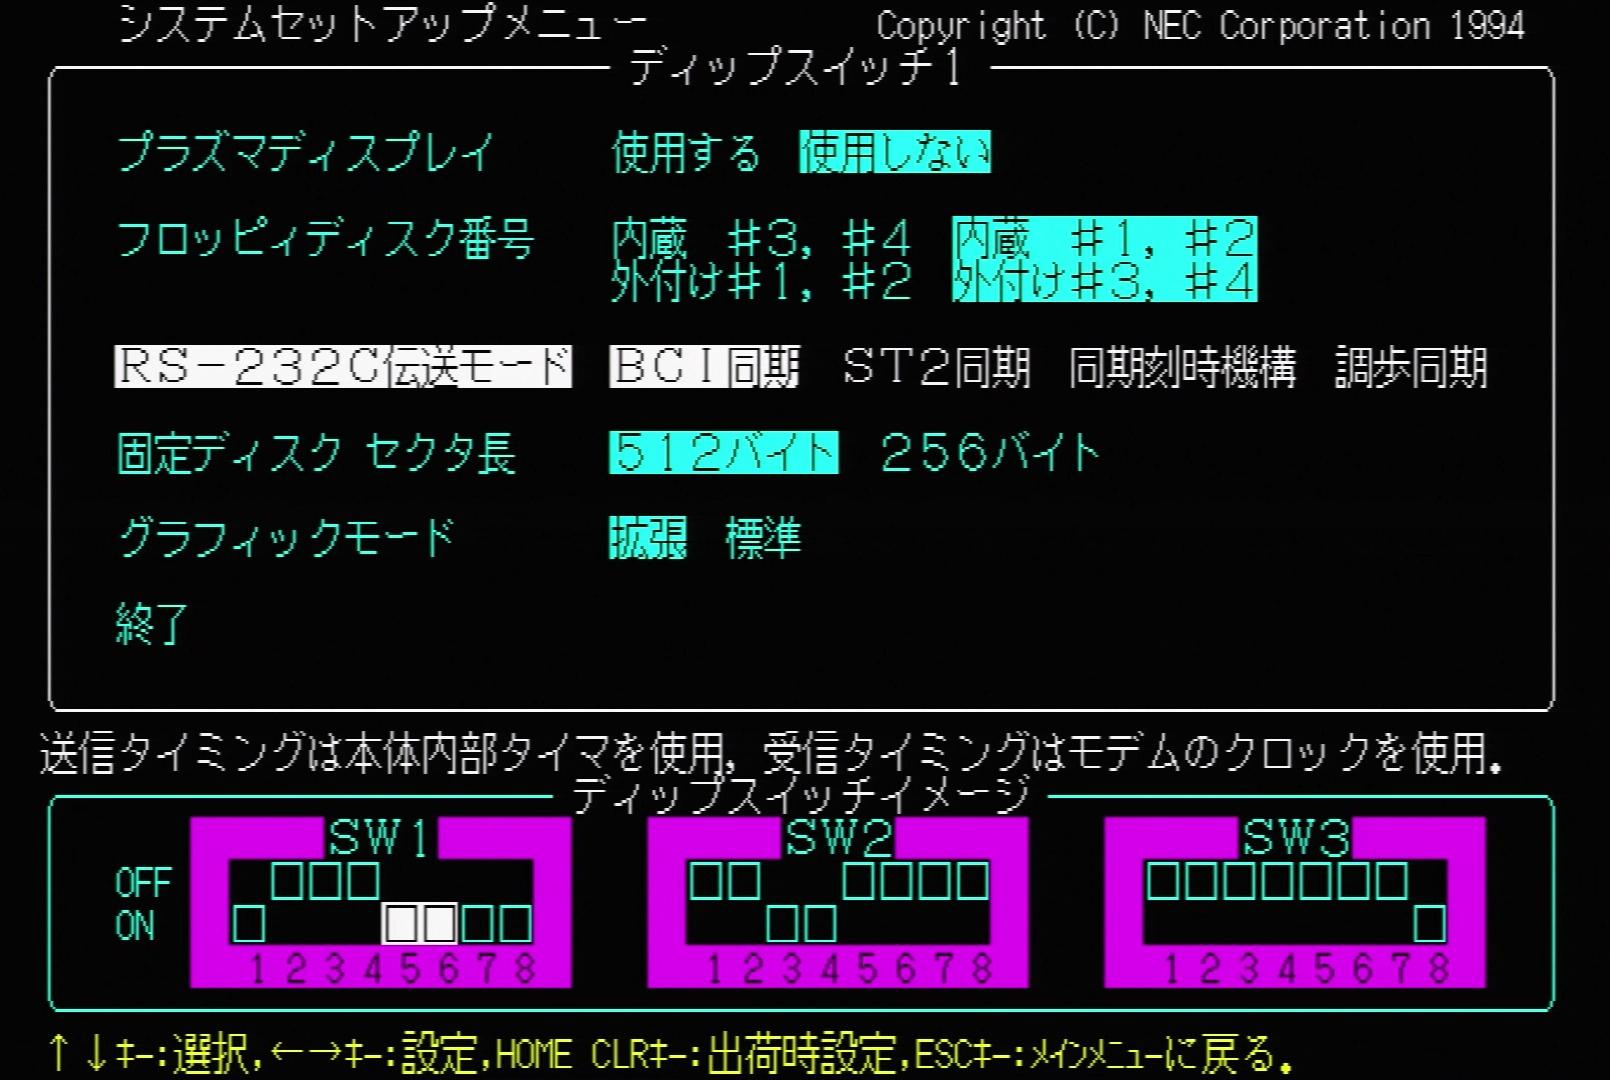
RS-232C Transmission Mode – BCI Sync | ST2 Sync | Sync Clock | Asynchronous
Hints:
1. Use internal clock for transmission, use modem clock for reception.
2. Use modem clock for transmission and reception.
3. Use clock signal created from received data for reception, use internal clock for transmission.
4. Use internal clock for transmission and reception.
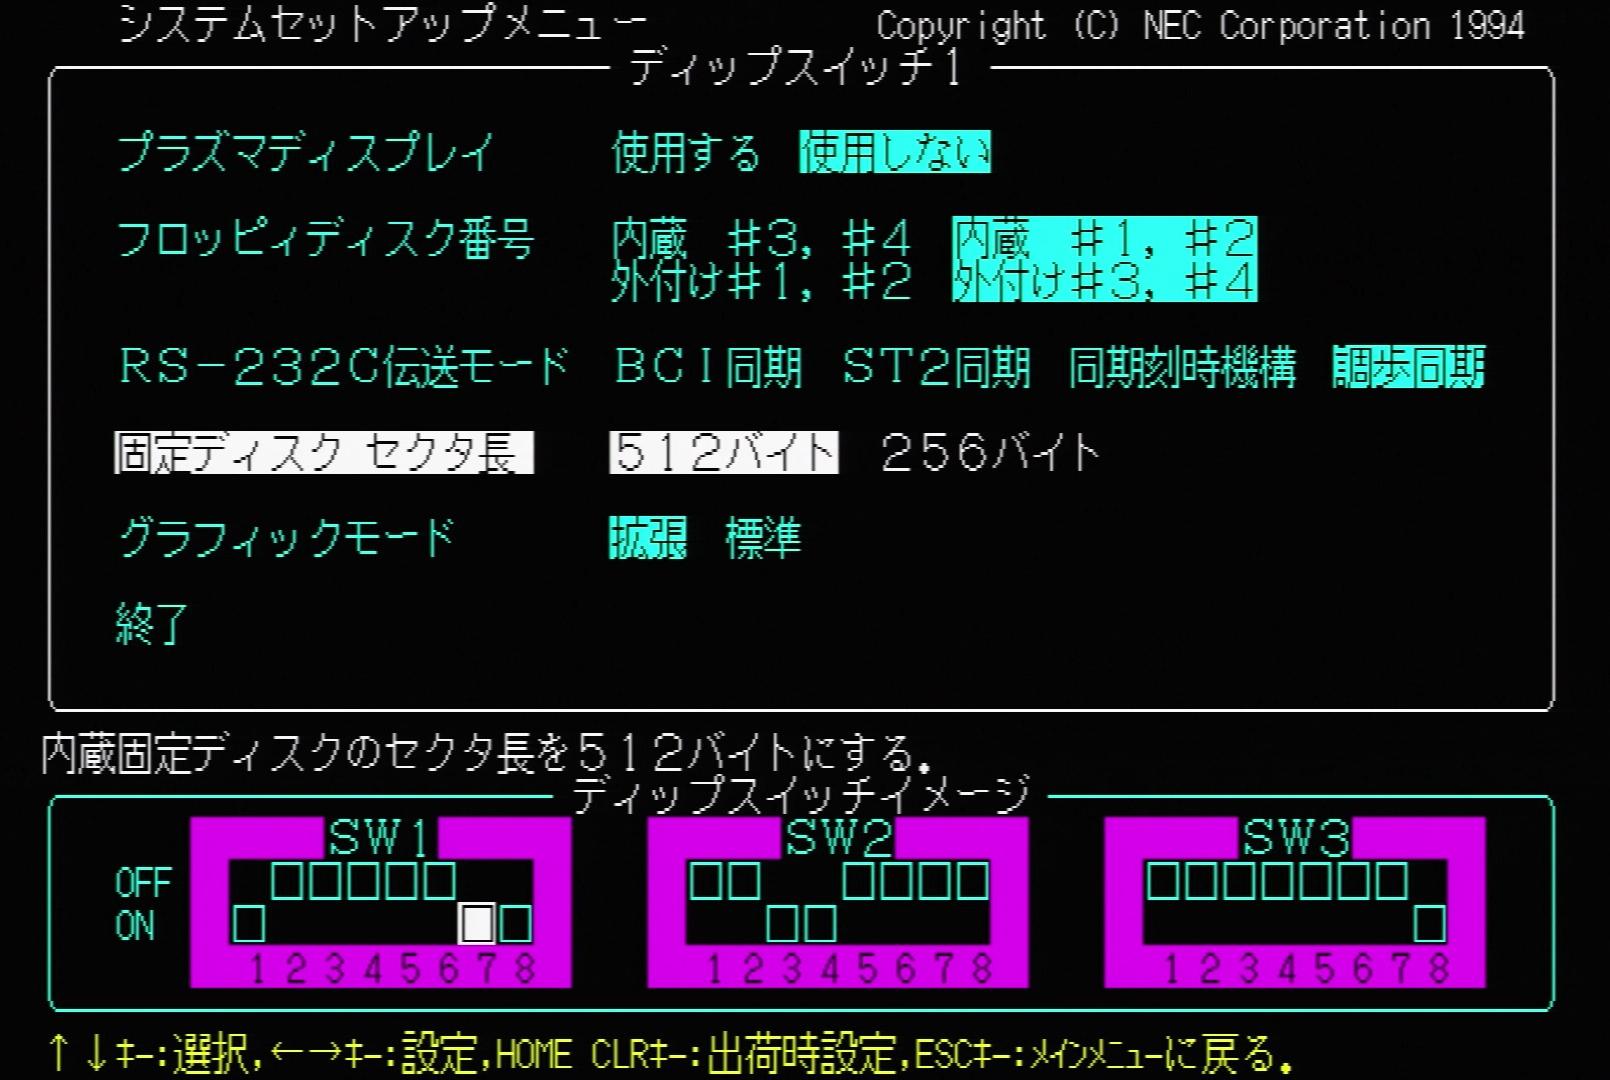
Hard Disk Sector Size – 512 bytes | 256 bytes
Hints:
1. Set the sector size of the internal hard disk to 512 bytes.
2. Set the sector size of the internal hard disk to 256 bytes.

Graphics Mode – Enhanced | Standard
Hints:
1. Enhanced graphics mode, 16 out of 4096 colors.
2. Standard graphics mode, 8 out of 8 colors.
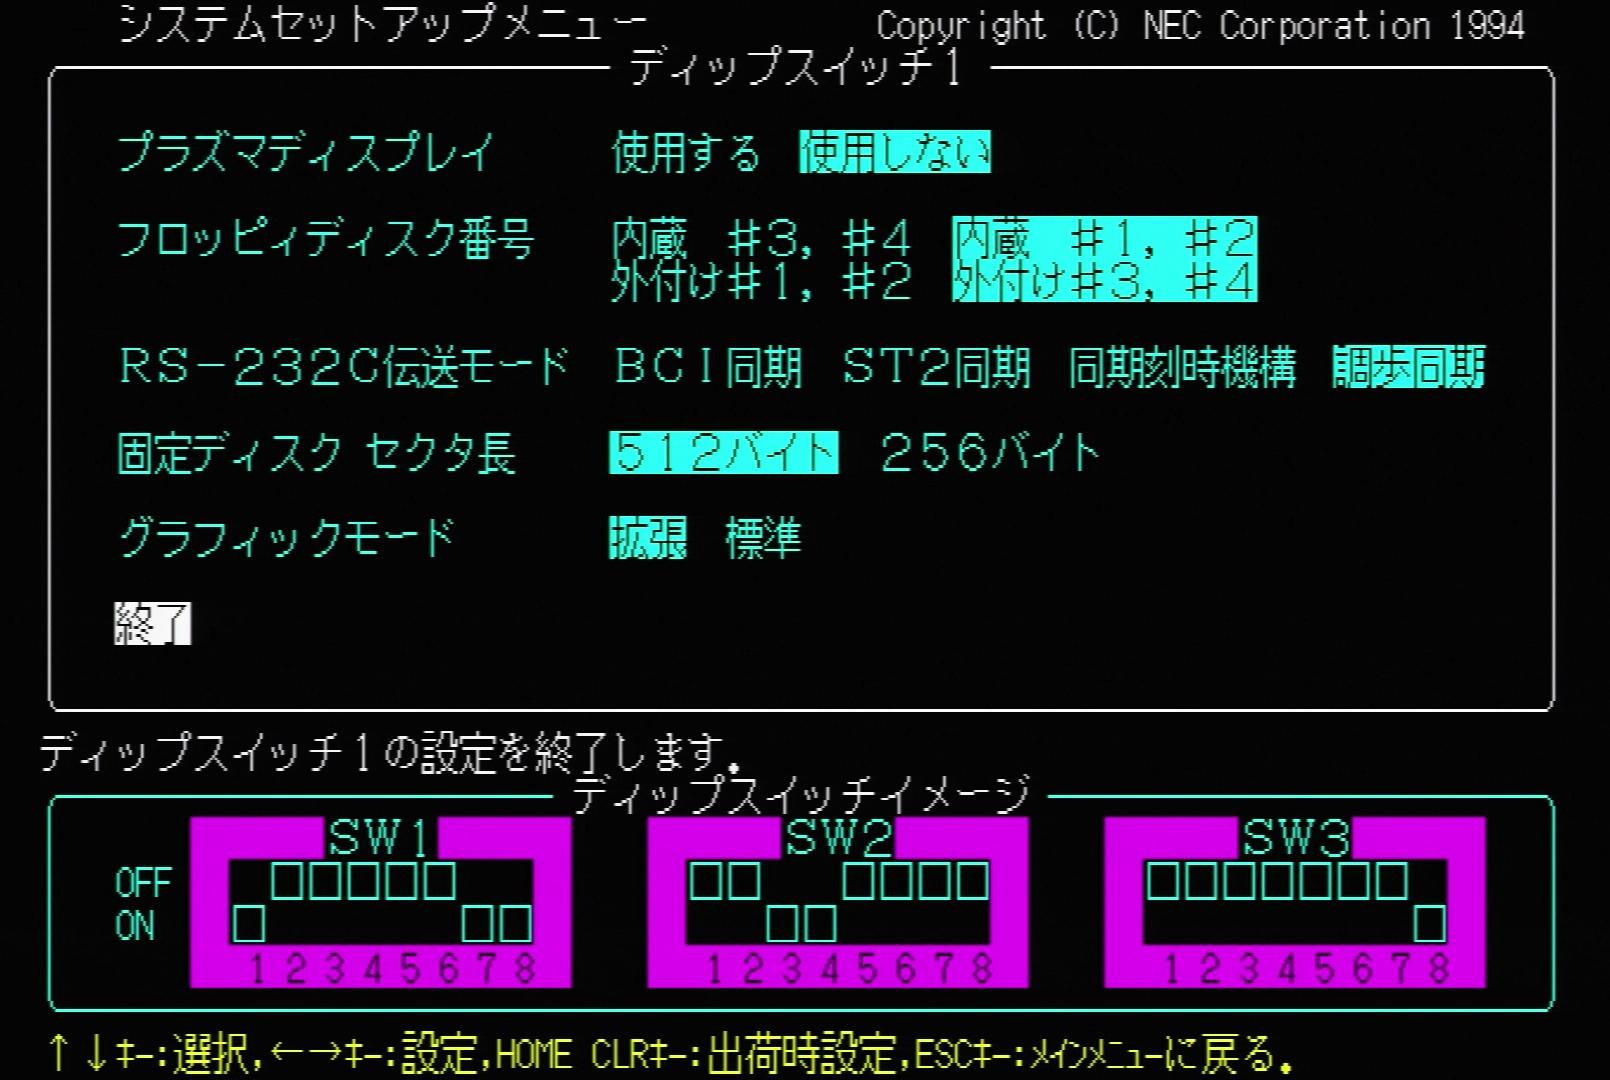
End
Hint: Exit the DIP Switch 1 settings.
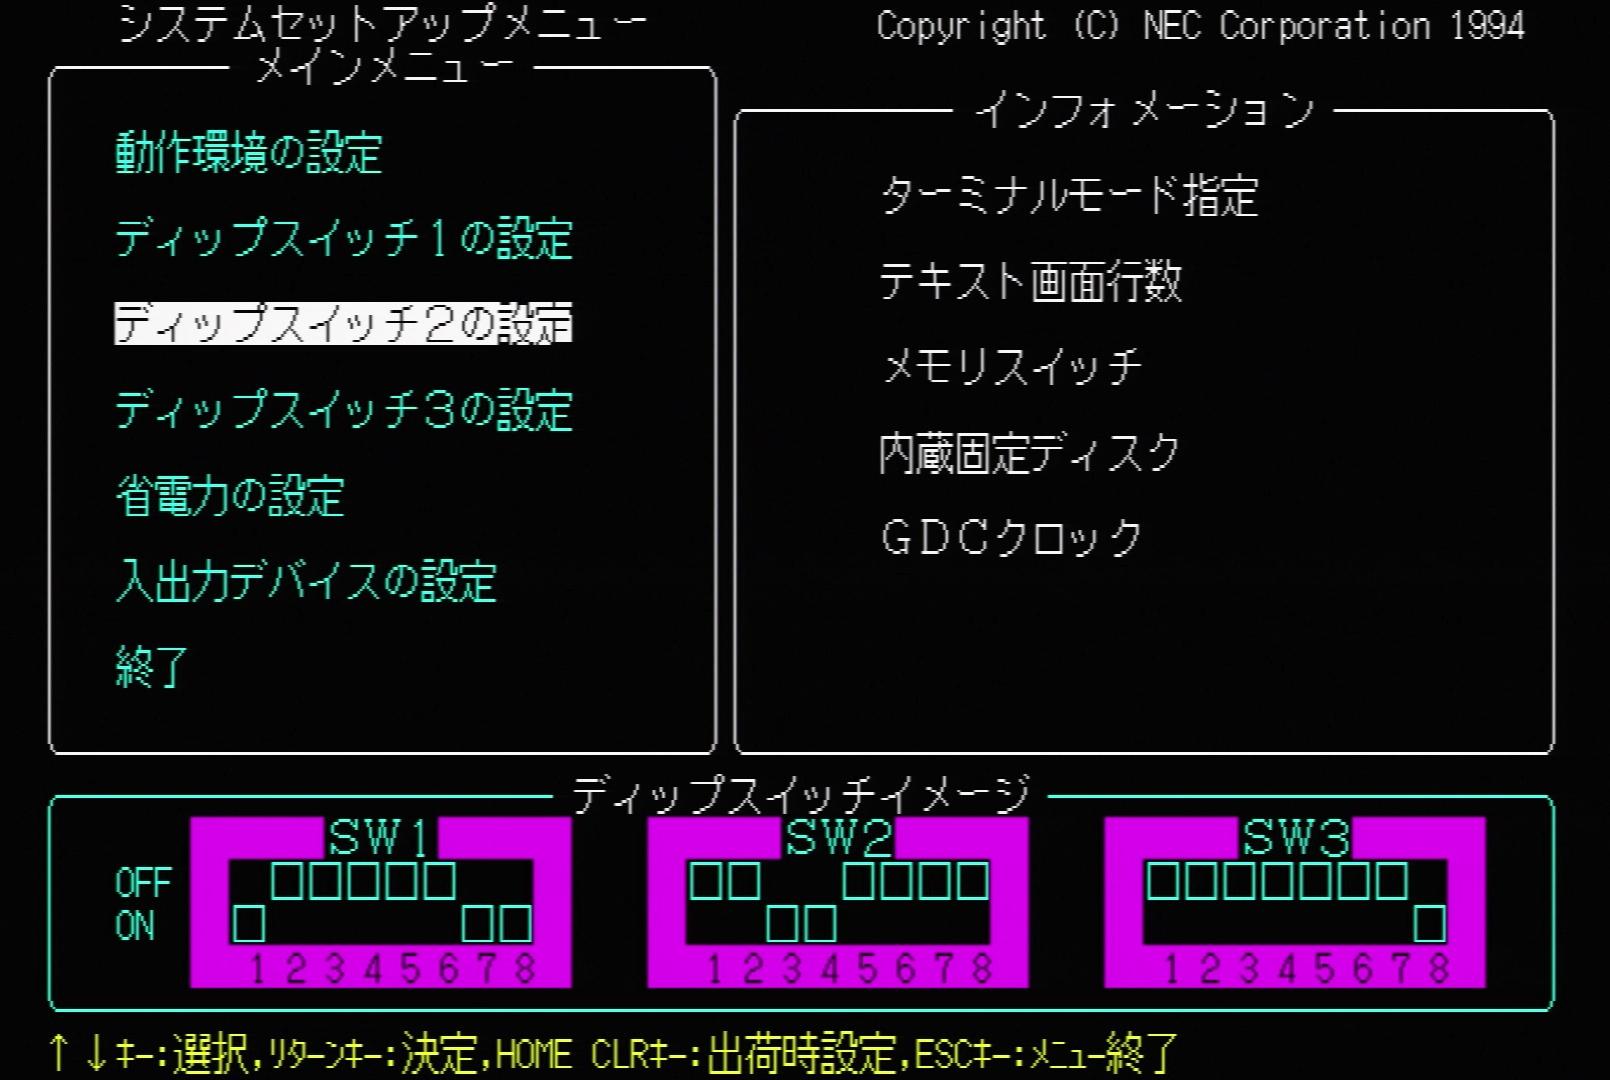
3. DIP Switch 2 Settings
Information:
Terminal Mode Specification
Lines of Text per Screen
Memory Switch
Internal Hard Disk
GDC Clock
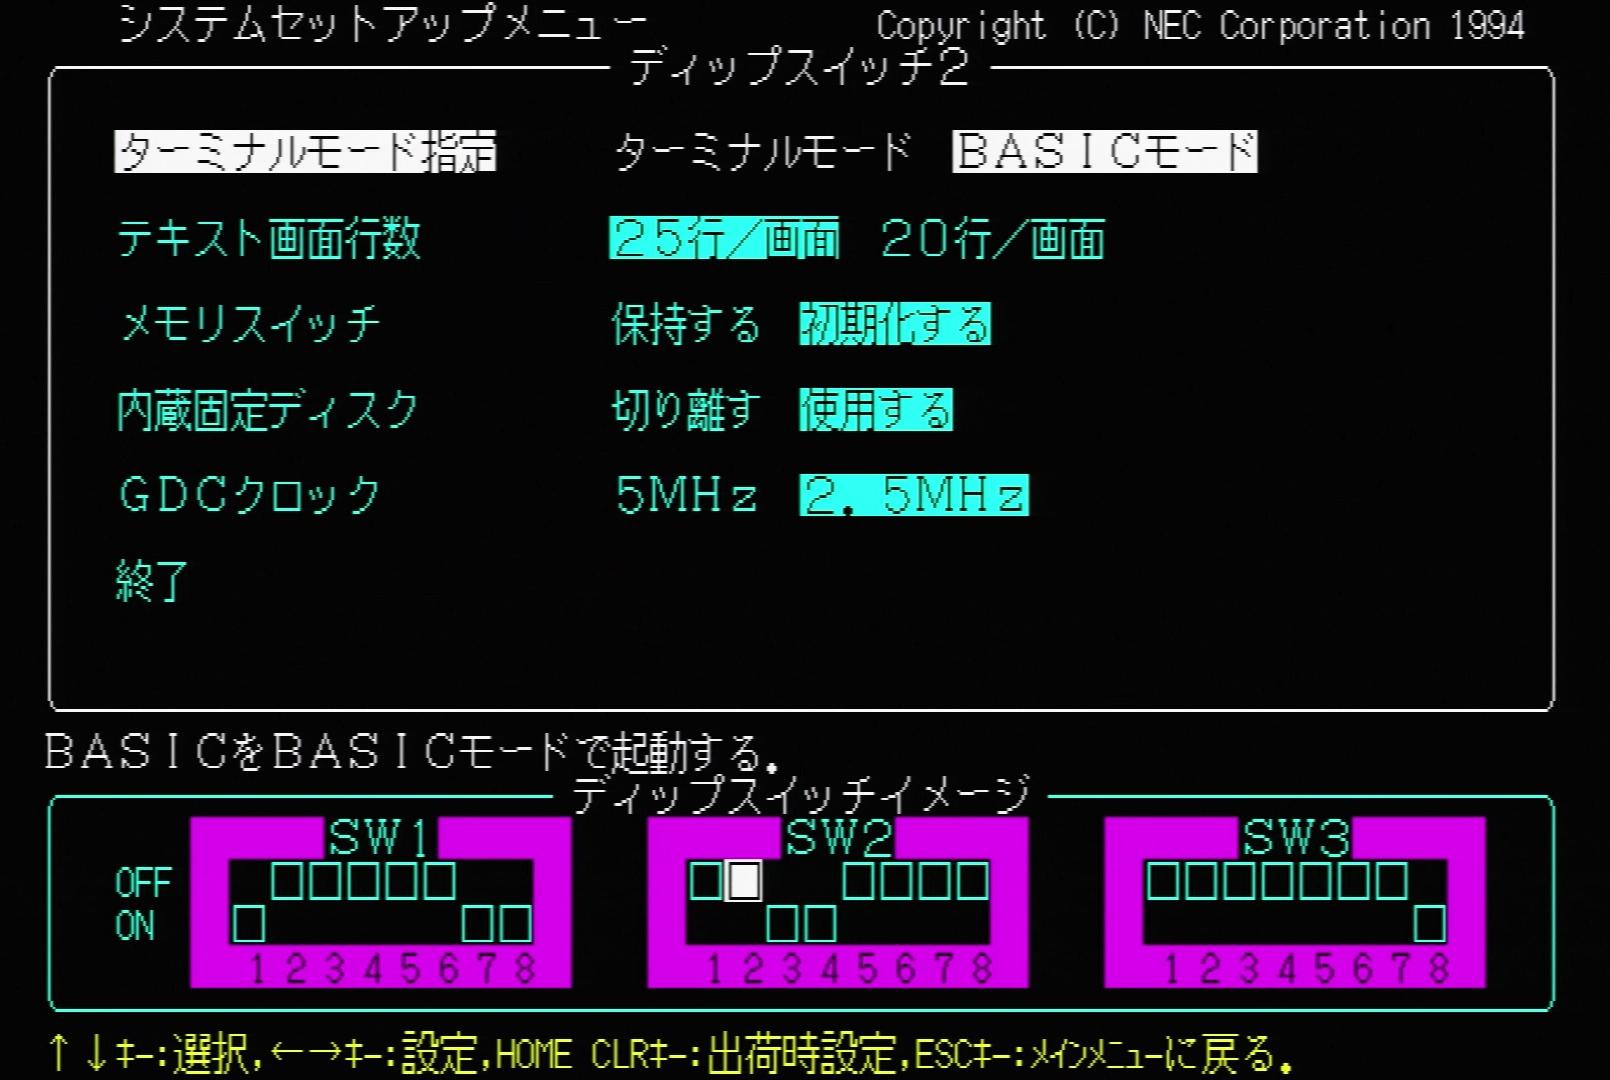
Terminal Mode Specification – Terminal Mode | BASIC Mode
Hints:
1. Start BASIC in terminal mode.
2. Start BASIC in BASIC mode.
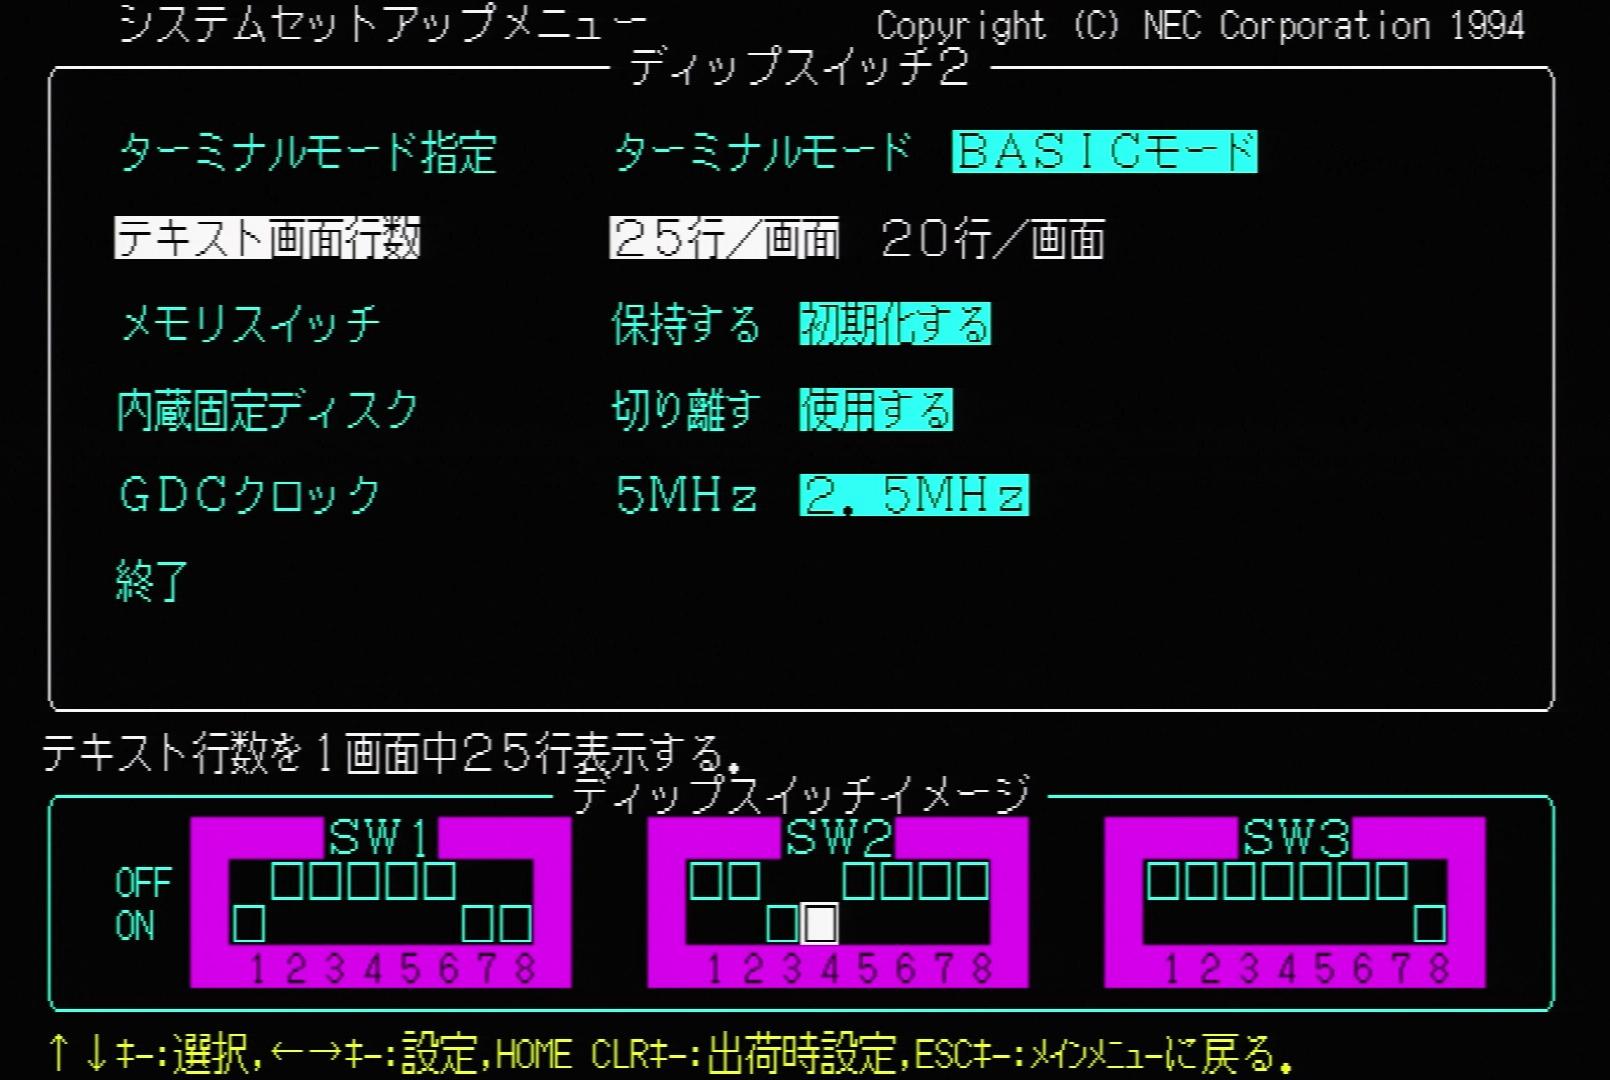
Lines of Text per Screen – 25 lines/screen | 20 lines/screen
Hints:
1. Display 25 lines of text per screen.
2. Display 20 lines of text per screen.

Memory Switch – Keep | Initialize
Hints:
1. Keep the contents of the memory switch at startup.
2. Initialize the contents of the memory switch at startup.
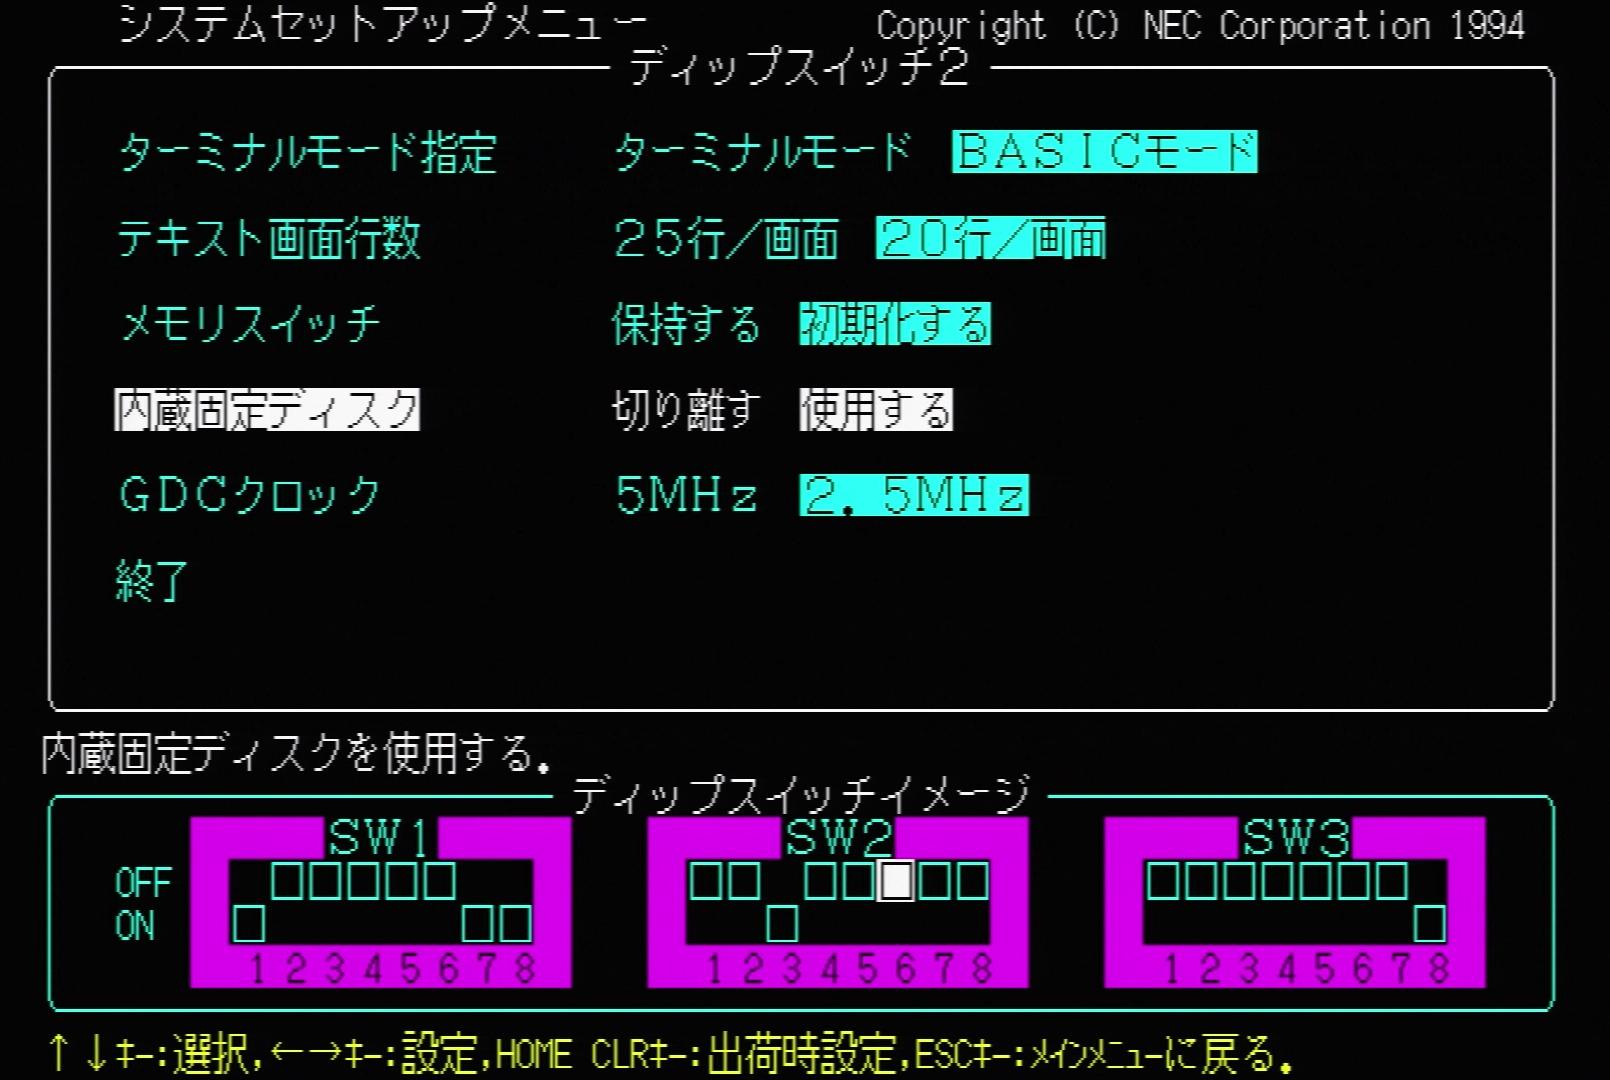
Internal Hard Disk – Disabled | Enabled
Hints:
1. Disable internal hard disk
2. Enable internal hard disk.

GDC Clock – 5MHz | 2.5MHz
Hints:
1. Operate GDC with 5MHz clock.
2. Operate GDC with 2.5MHz clock.

End
Hint: Exit the DIP Switch 2 settings.
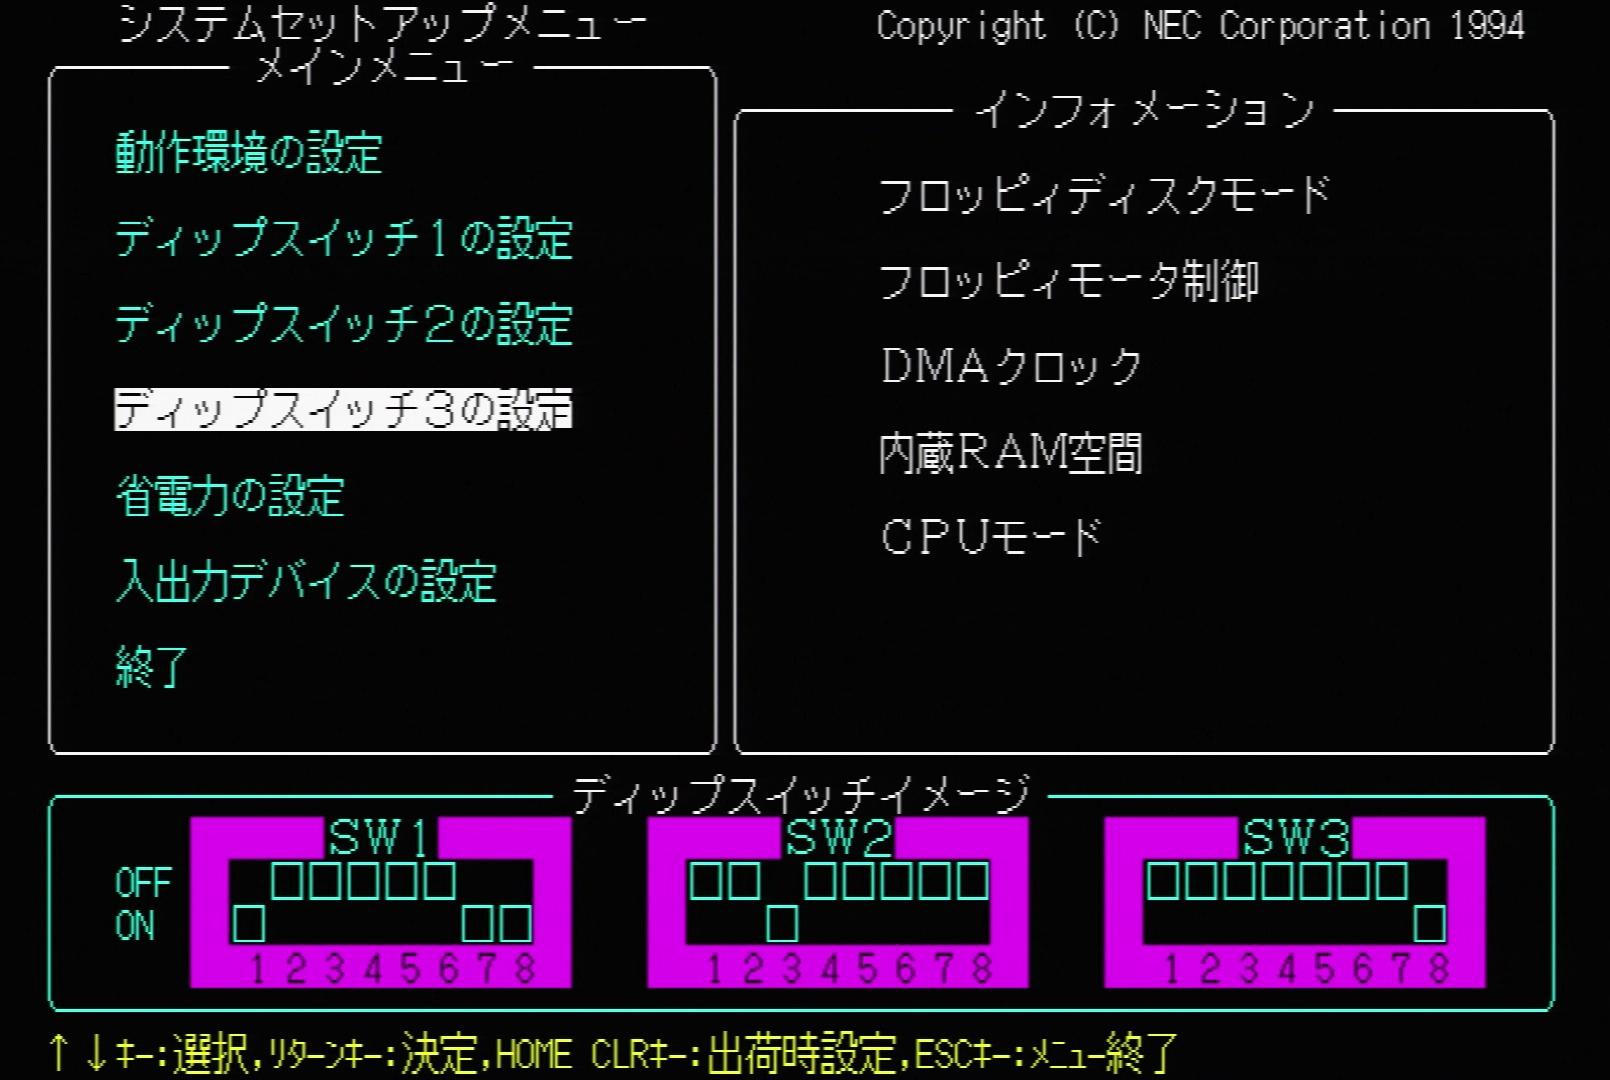
4. DIP Switch 3 Settings
Information:
Floppy Disk Mode
Floppy Motor Control
DMA Clock
Internal RAM Hole
CPU Mode

Floppy Disk Mode – 640K | 1M | Automatic (640K) | Automatic (1M)
Hints:
1. Use internal floppy disk drive with 640Kbyte fixed.
2. Use internal floppy disk drive with 1Mbyte fixed.
3. Automatic recognition of 640Kbyte/1Mbyte. Use 640Kbyte when starting with another device.
4. Automatic recognition of 640Kbyte/1Mbyte. Use 1Mbyte when starting with another device.

Floppy Motor Control – Disable | Enable
Hints:
1. Do not control floppy disk motor.
2. Stop floppy disk motor if no access for 15 seconds.

DMA Clock – High-Speed | Compatible
Hints:
1. Operate DMA with high-speed clock.
2. Operate DMA with compatible clock.
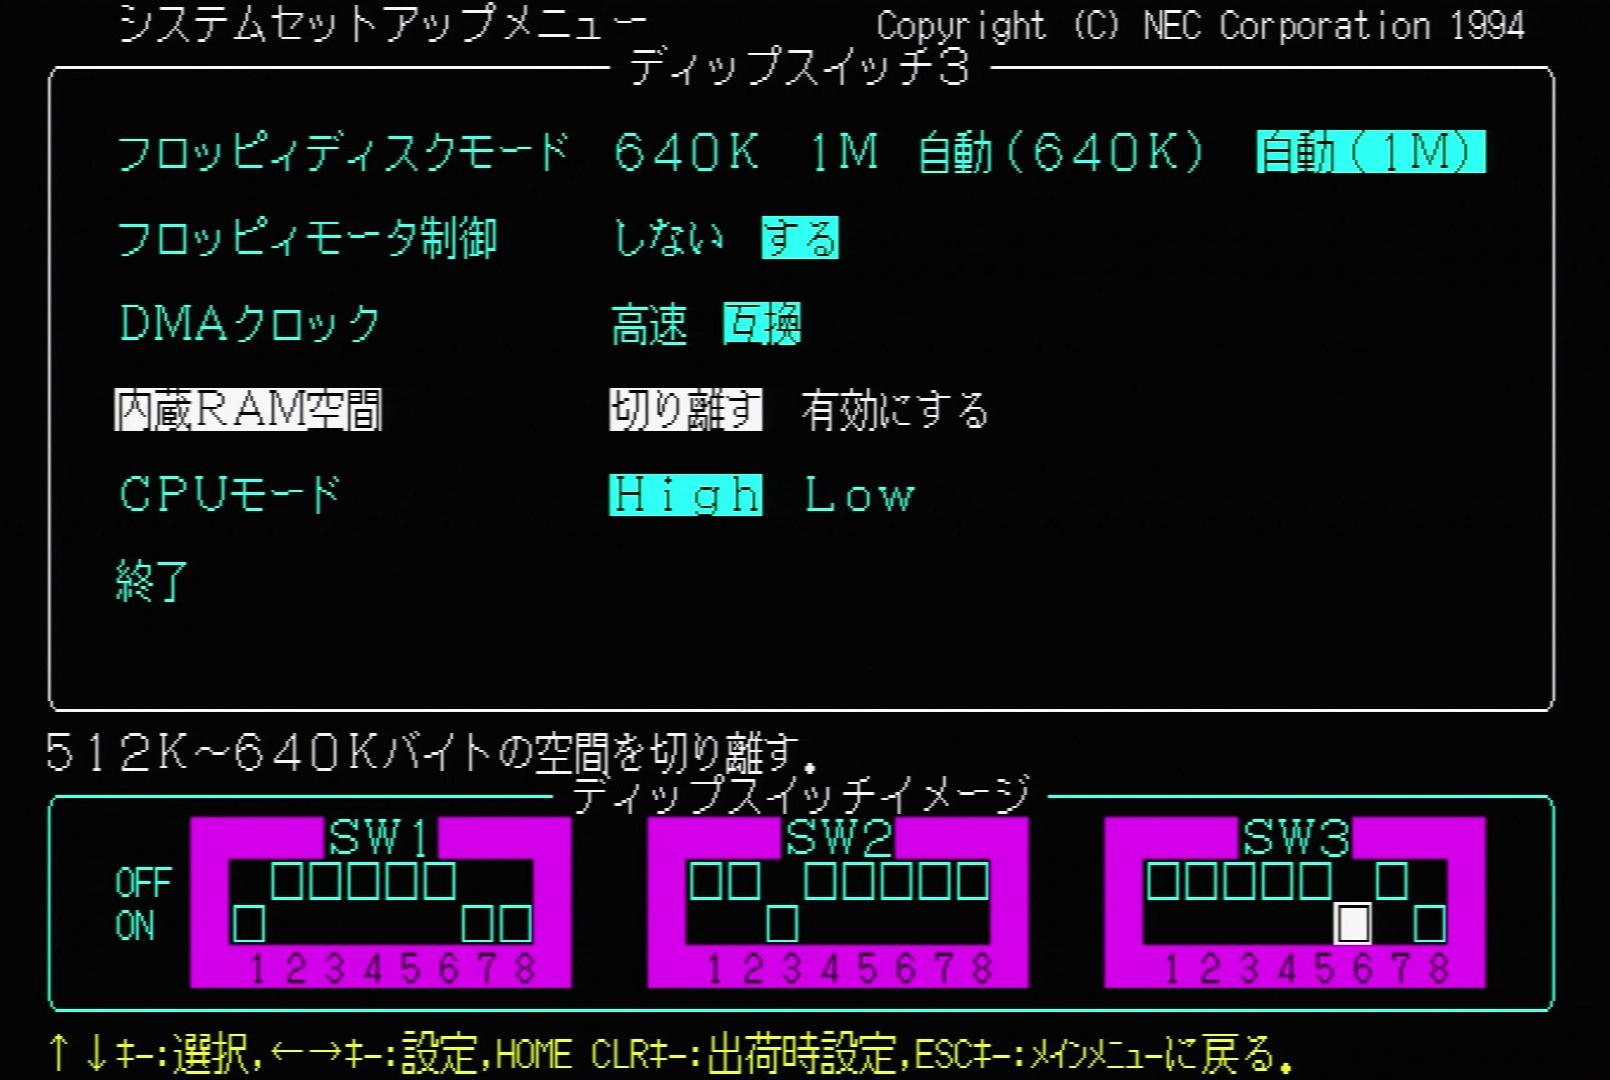
Internal RAM Hole – Disabled | Enabled
Hints:
1. Disable memory hole at 512K-640Kbytes.
2. Enable memory hole at 512K-640Kbytes.

CPU Mode – High | Low
Hints:
1. Start in High mode.
2. Start in Low mode.
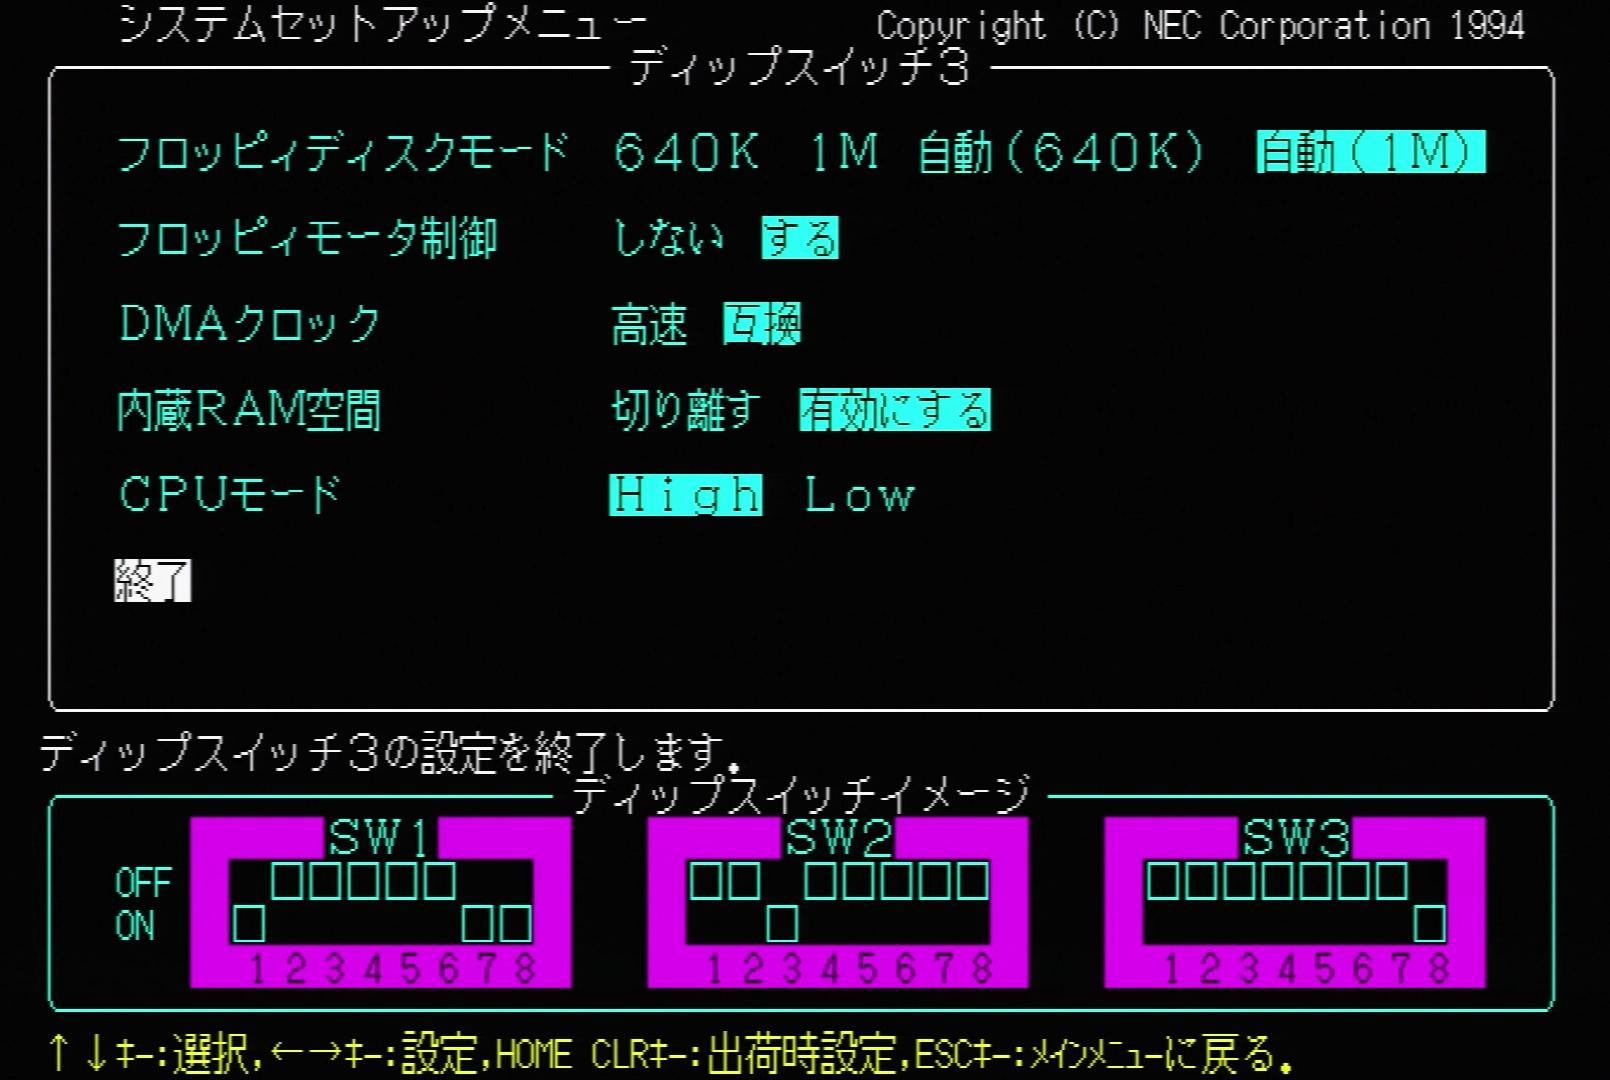
End
Hint: Exit the DIP Switch 3 settings.
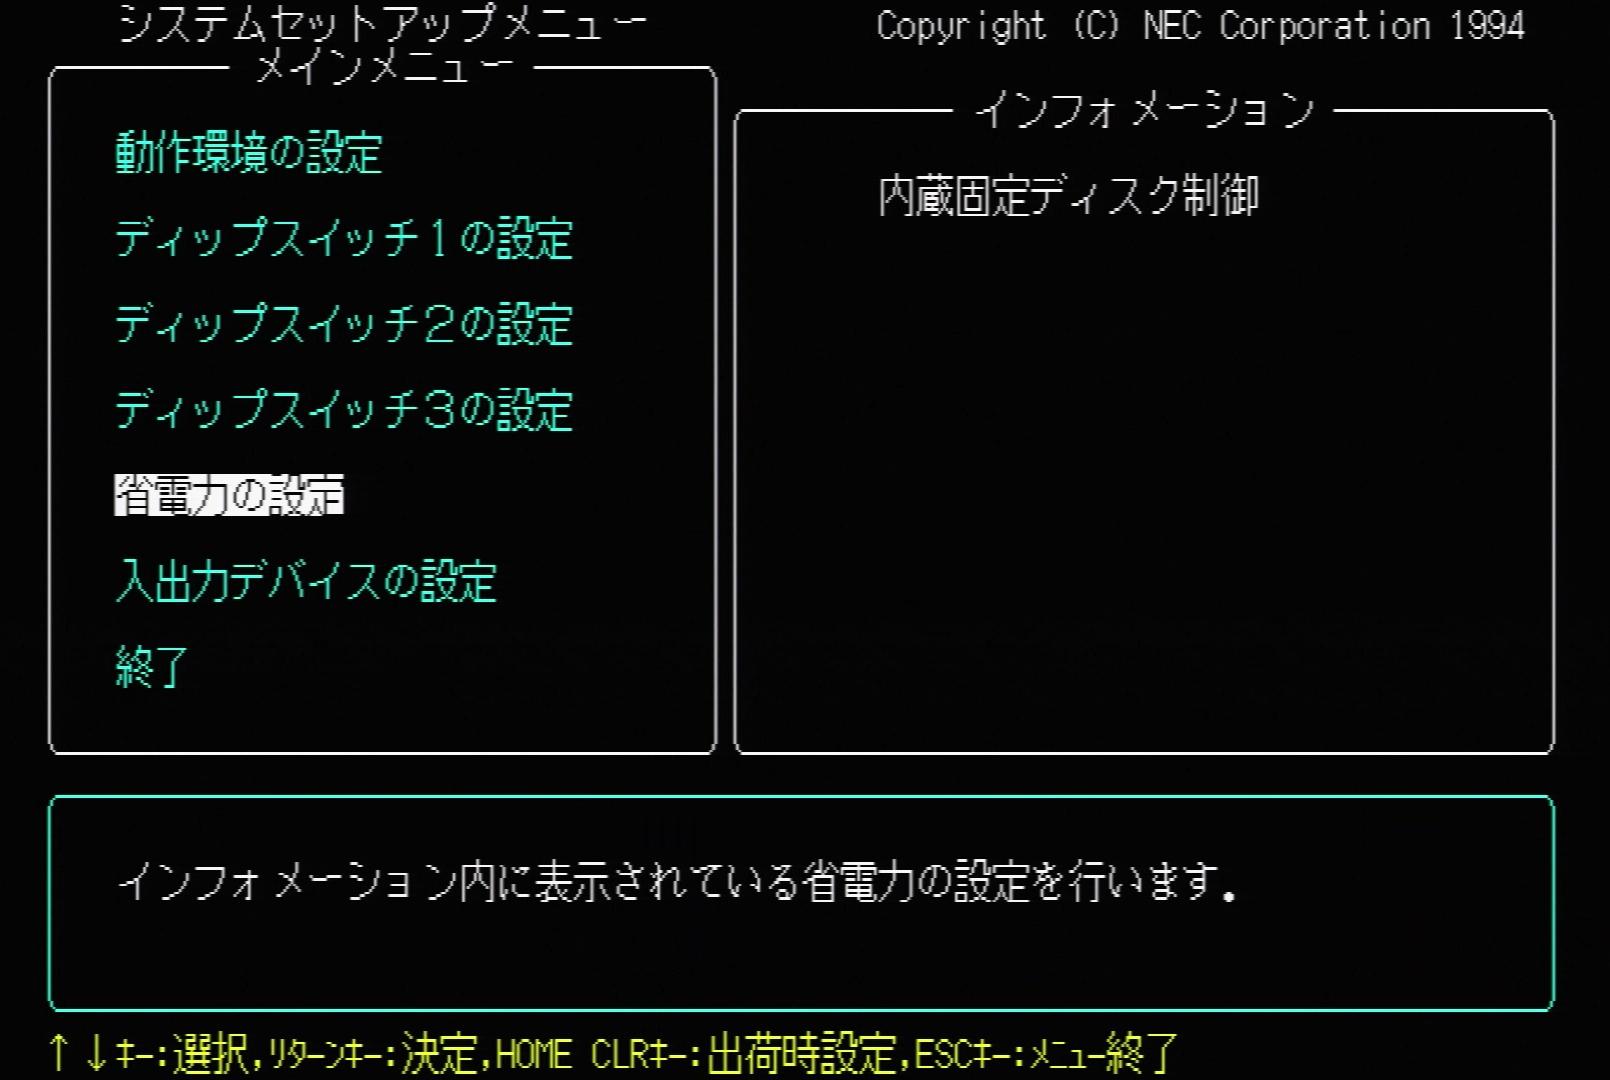
5. Power Saving Settings
Information:
Internal Hard Disk Control
Hint: Configure the power saving settings displayed in the information.

Internal Hard Disk Control – Enable (15 Minutes) | Disable
Hints:
1. Stop the hard disk motor when there is no access within the set time.
The time can be set from minimum 15 minutes up to 60 minutes.
Set the time with the [ROLL UP] and [ROLL DOWN] keys.
2. Do not control the motor of the internal hard disk.
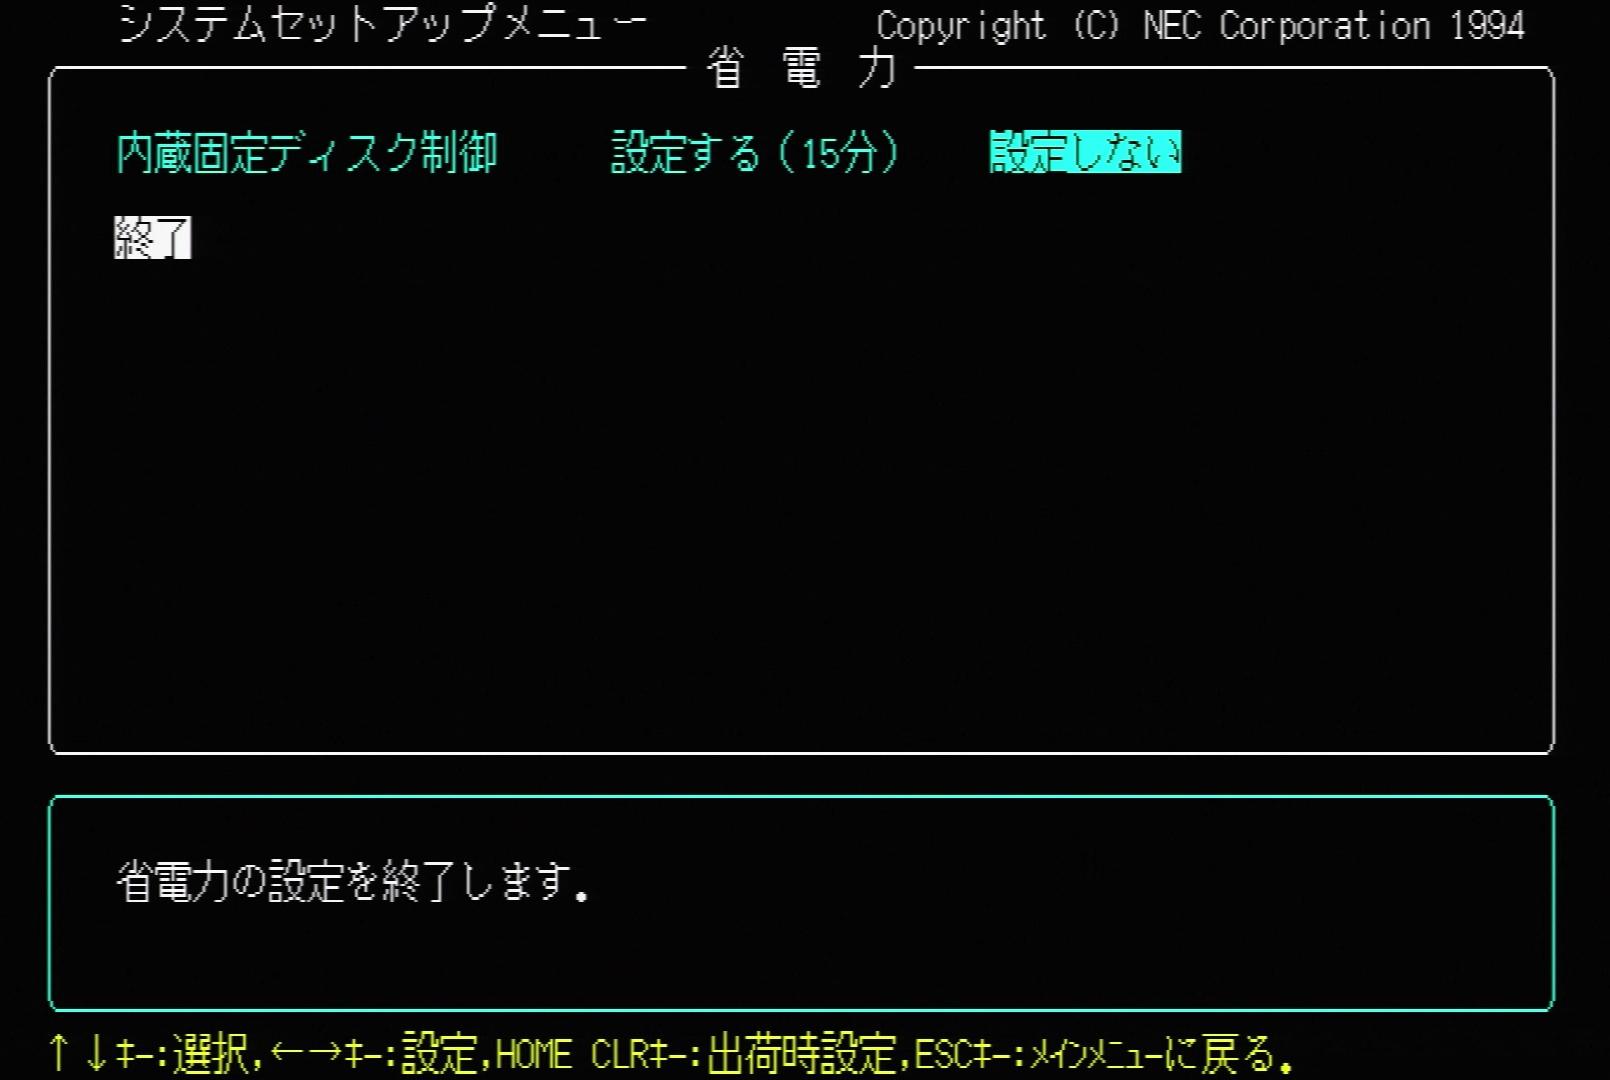
End
Hint: Exit the power saving settings.
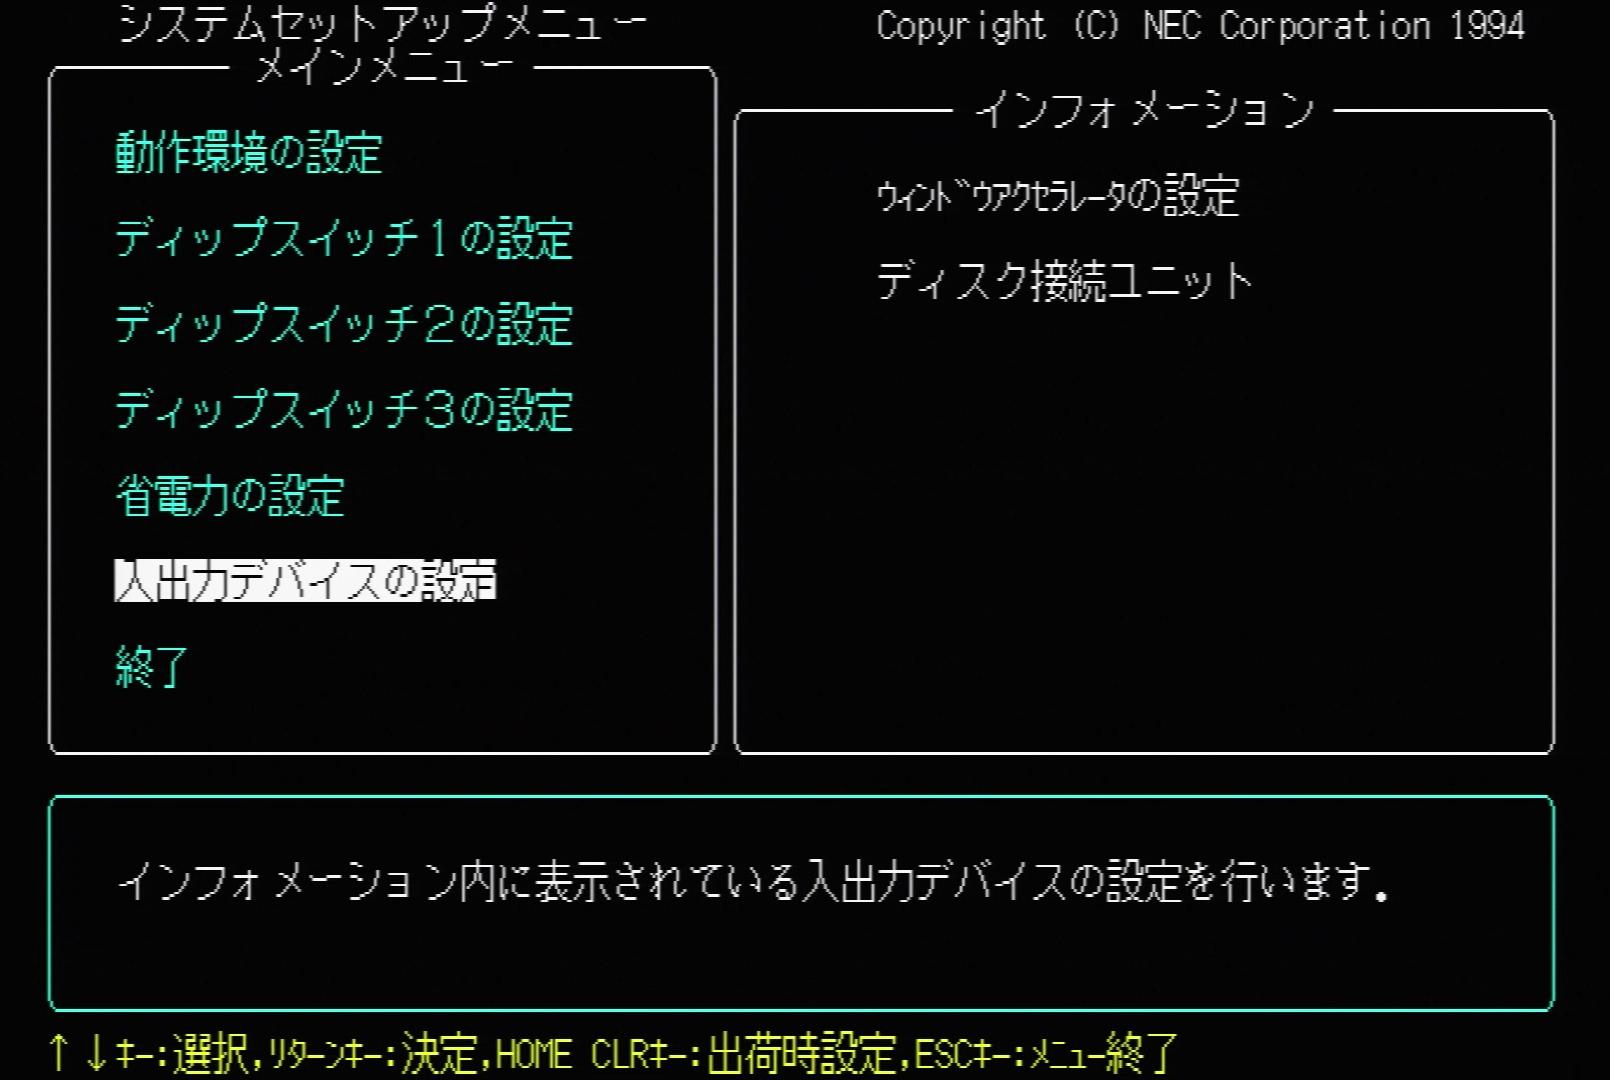
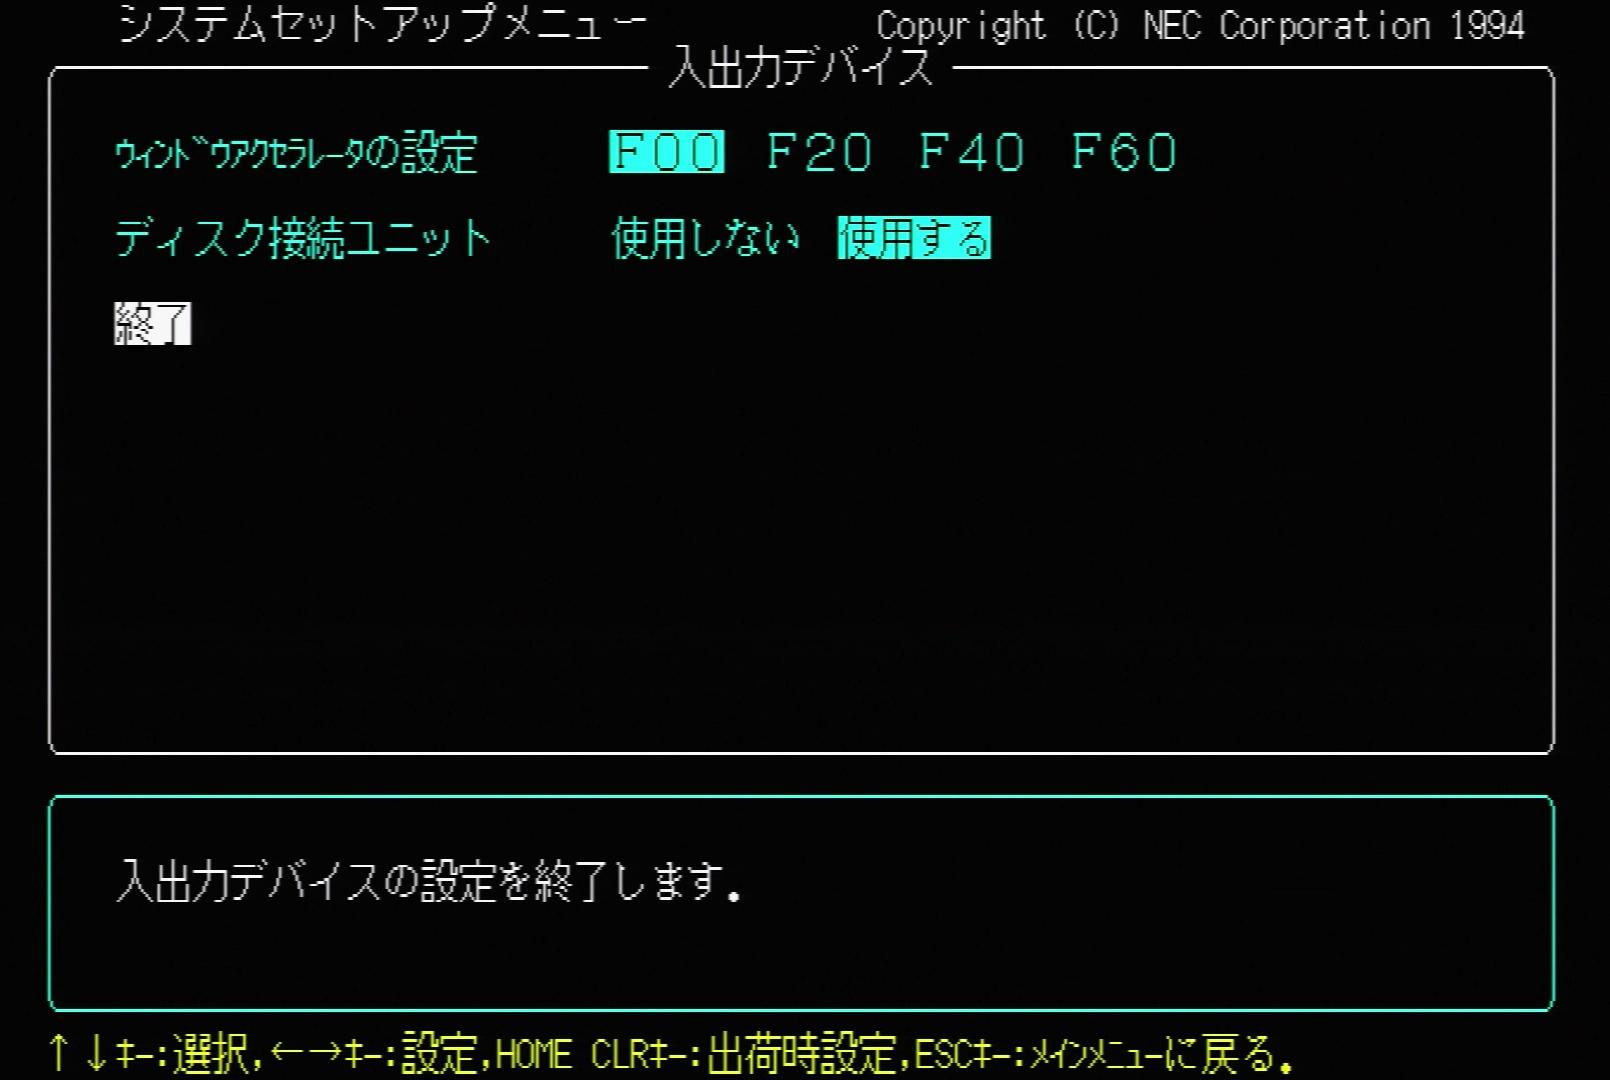
6. I/O Device Settings
Information:
Window Accelerator Configuration
Disk Interface Unit
Hint: Configure the input/output devices displayed in the information.
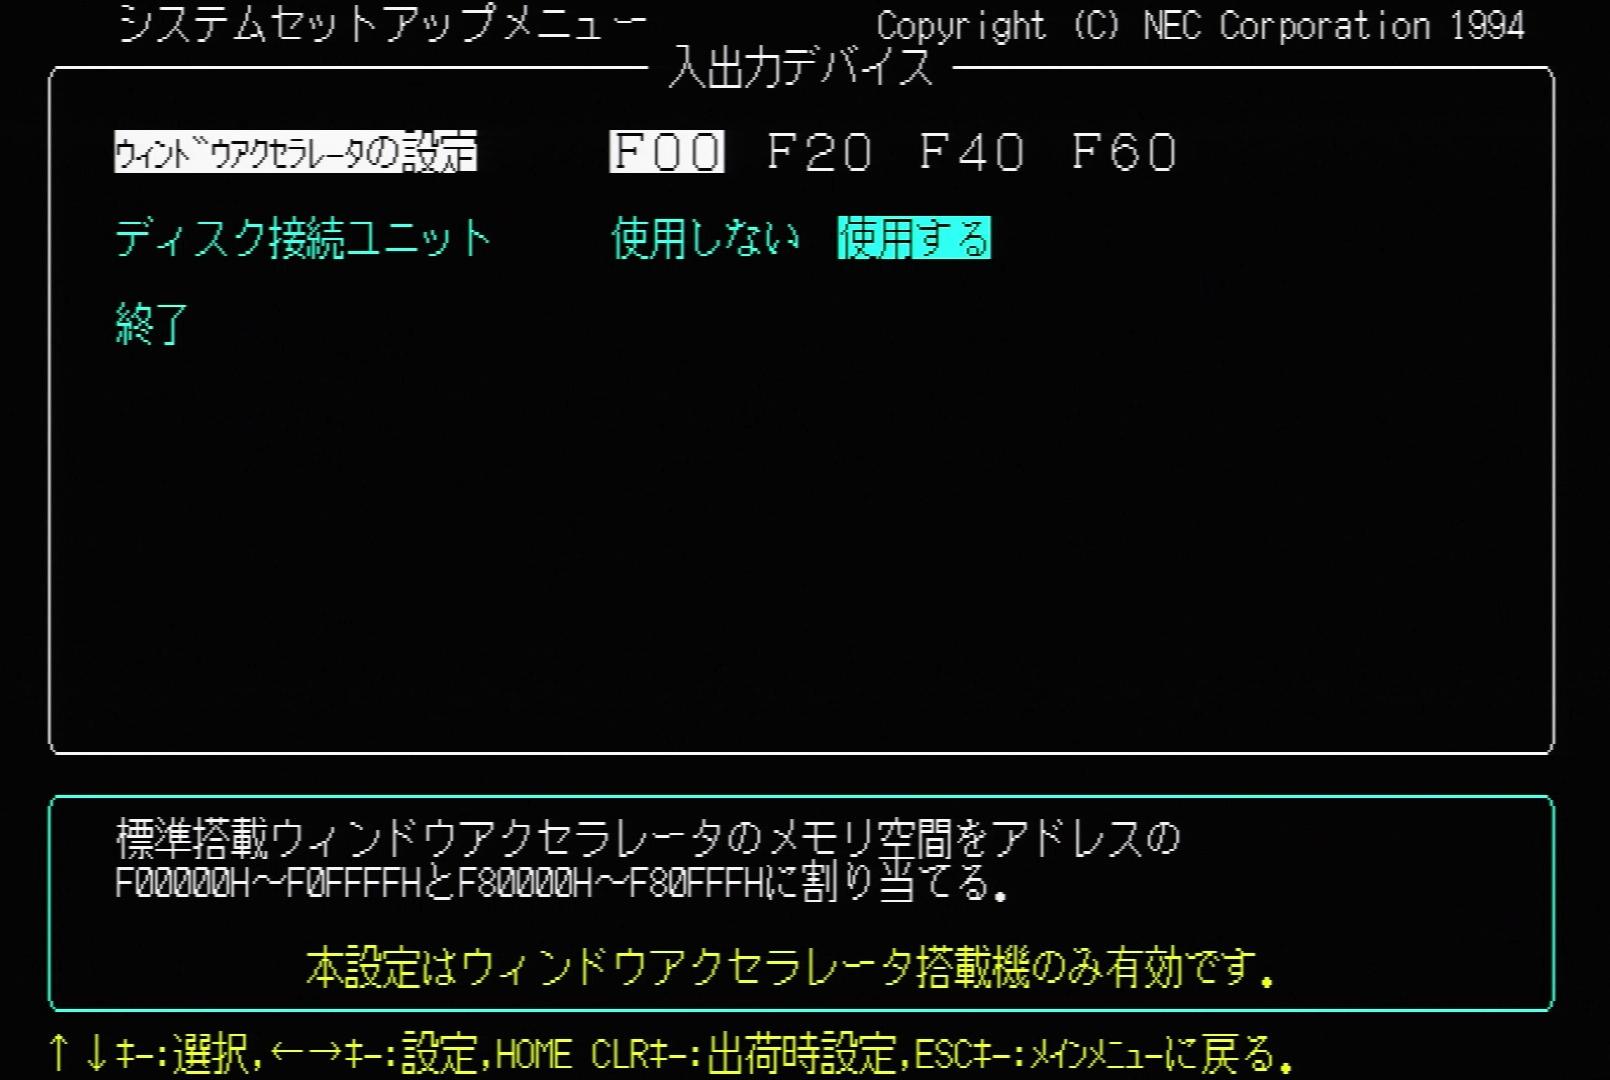
Window Accelerator Configuration – F00 | F20 | F40 | F60
Hints:
This setting is available only for machines with installed Window Accelerator.
1. The standard memory for Window Accelerator is allocated to addresses F00000H-F0FFFFH and F80000H-F80FFFH.
2. The standard memory for Window Accelerator is allocated to addresses F20000H-F2FFFFH and F88000H-F88FFFH.
3. The standard memory for Window Accelerator is allocated to addresses F40000H-F4FFFFH and F90000H-F90FFFH.
4. The standard memory for Window Accelerator is allocated to addresses F60000H-F6FFFFH and F98000H-F98FFFH.
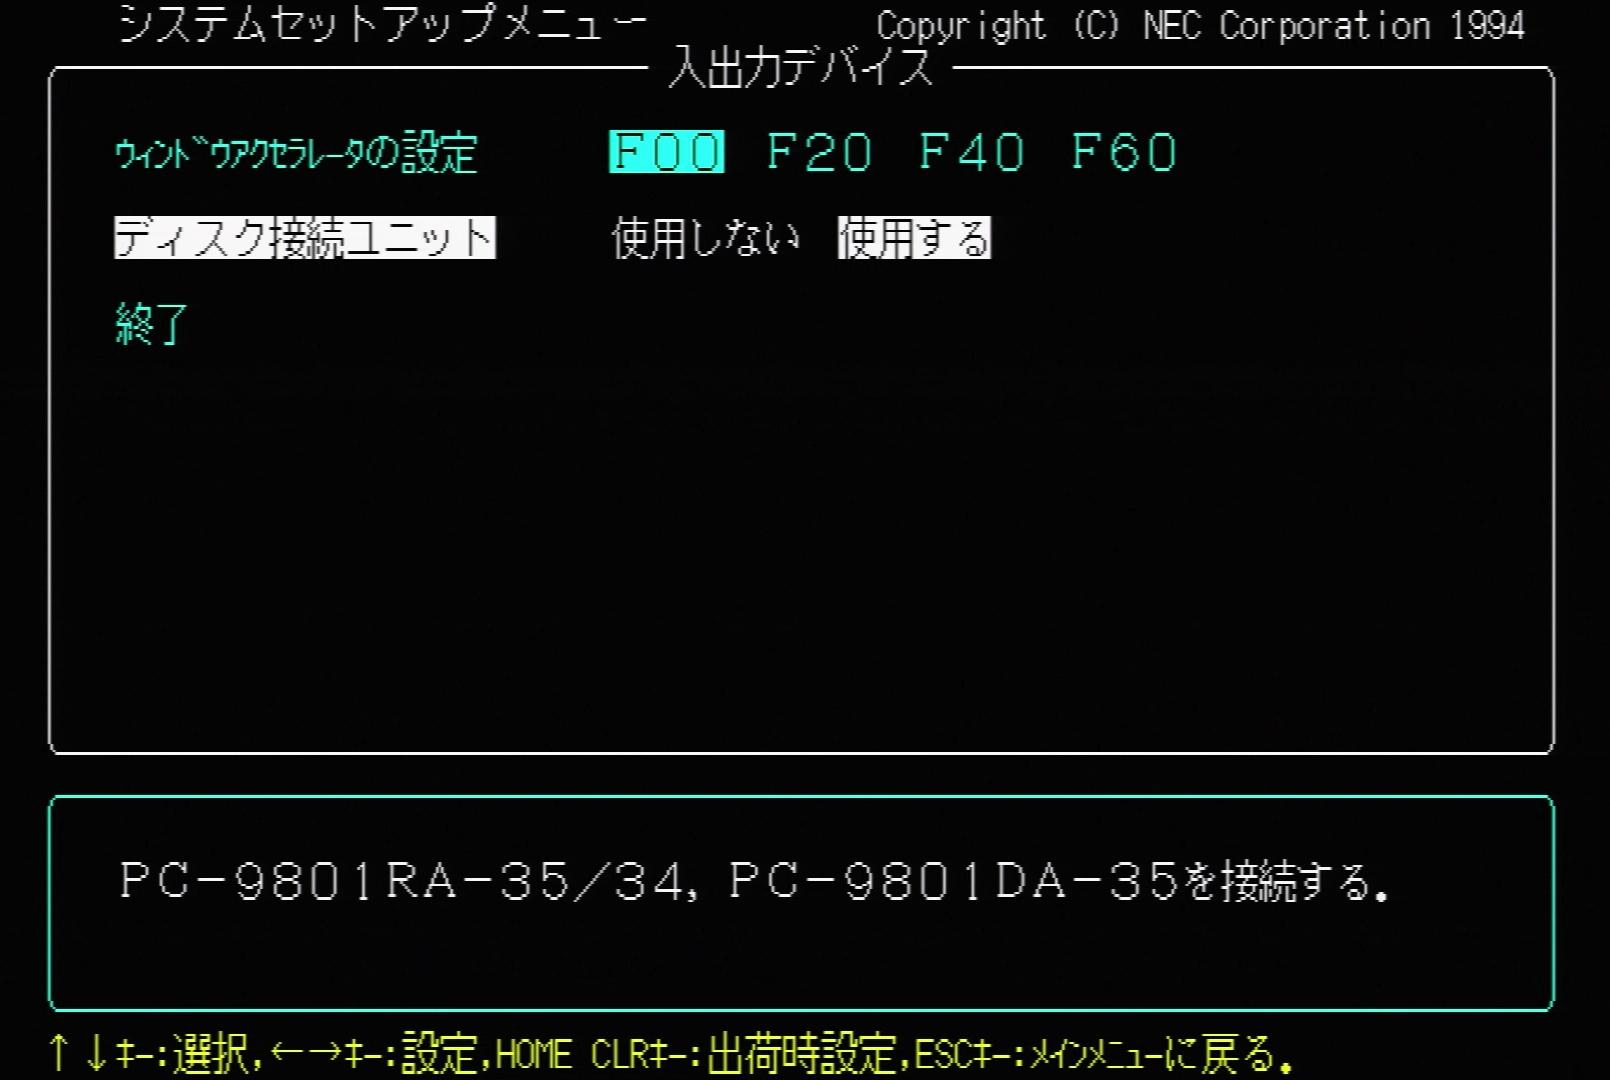
Disk Interface Unit – Disabled | Enabled
Hints:
1. PC-9801RA-35/34, PC-9801DA-35 not connected.
2. PC-9801RA-35/34, PC-9801DA-35 connected.
End
Hint: Exit the I/O device settings.
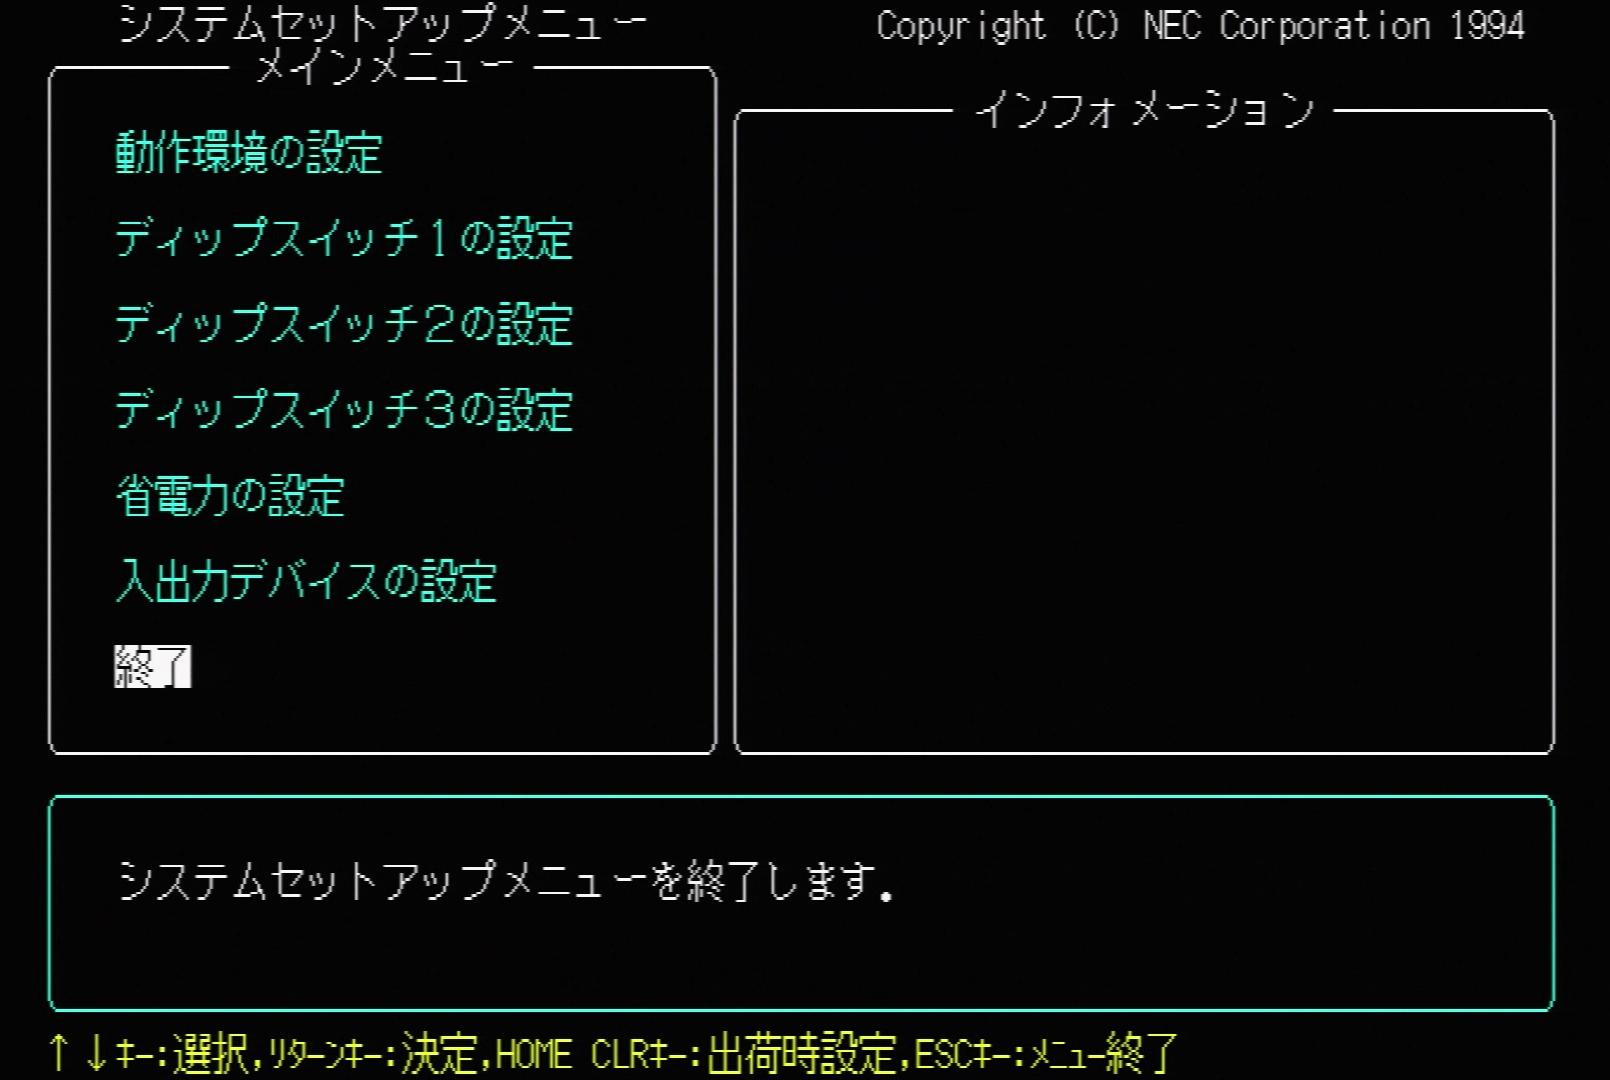
7. End
Hint: Exit the System Setup Menu.
I’m trying to convert the IDE hard disk to SATA hard disk but some how it did not recognize. Is the any setting in the BIOS which i can set to let it recognize? Thanks.
Sorry, I’ve never heard of using a SATA HDD in a PC-9821. Did you follow a tutorial? Usually, I replace the IDE HDD with a CF card.
Thanks for the reply. My colleague have done it by using a sata to ide adapter and it works for a few PC9800 series. I’ve tried cloned the original IDE HDD and bought the adapter too but some how the process stopped after the memory check. Wonder is any hard disk setting which i could set it. Thanks.
The only relevant HDD settings that I see are the sector size and turn internal HDD on/off. Try a completely blank HDD and boot with a DOS floppy to see if FORMAT can handle it. However, when the HDD is too big then you’re out of luck. I never tried CF cards bigger than 2 GB…
When i try access my floppy disk drive on a NEC 9801, the system prompted “parity error-base memory”. Any idea what could it be? Drive issue, ram? Thxs.
I haven’t encountered this before with my 9821, so I’ll have to guess: Check for bad RAM, dirty contacts and backup battery.
Thxs for your reply. Anyway this old computer running with NEC D3765 hard disk, recently I’m trying to clone it using a cloner. Unfortunately it failed due to bad sector found. Any recommendations on cloning /image software i can use? Thxs.
Sorry, haven’t done that before. If you check the Vogons forum, somebody with a NEC D3766 hdd managed to create an image with dd.
Hi Experts,
We try to extened the keyboard and mouse to another place with standard KVM switch ( only has ps2 connector).
Try insert new PCI card for PS2 mouse and keyborad , and of course no lucky the K/M is not active.
After Google serach this is the only few palce talking about the really old machine.
After through the BIOS setting above no thing was found. Is there special way to enable the card ?
Any advice will appreciate
This BIOS is from a model without PCI slot. Sorry, can’t help you with that.